

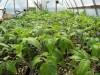
Time to thin out the lettuce and arugula. Between the seven varieties, some of the seed I used was up to four years old, so to be safe, I was quite generous, maybe 4-5 seeds per cell for the arugula, and a bit more for the lettuce (that tiny seed can get away from you, though with new seed, I try to go lighter). Germination was good, and the little seedlings are already shading out each other as they push for the light. I’m still getting used to timely, to-the-point thinning, both in the trays and in the field. I usually have the urge to leave ’em a while longer, but almost always, this ends up being not the best thing to’ve done. Give the best ones the biggest break as early on as possible, which means, kill off the rest. This also takes some timing experience, but in general, it’s hard to go wrong by not waiting around. Sounds brutal, but that’s about it! The lettuce will eventually be one per cell, although for now I’ll leave a couple per. Starting arugula indoors is a first for me, I usually direct-seed, so I’m figuring things out this time around. I’ll leave two per cell, and plant them out two together at 6″ (15cm) spacing and see how that works out. Here, I’m snipping arugula at the soil level with wickedly pointy little shears…

It looks like your sprouts are doing great. We’ve always direct-seeded all of our greens, so we’re watching your progress closely!
You should offer 101 vegetable gardening classes. I think you’re going to be my Gardening (Tiny Farming) Guru this year! There’s so much to learn!!!
I think this is going to be the hardest part about gardening.. who wants to kill off those beautiful baby sprouts!?!
Nicole,
It might make you feel better to throw the thinned sprouts into a salad. They’re delicious!
I second Gillian and Nicole.
There is so much to learn so thank you for sharing with us all
umm, yeah, what all those ladies said! Since I’m starting from scratch, container gardening with little to no knowledge, the thought of thinning hadn’t even occurred to me…I’d just have let everything grow wild, patted myself on my back for my mad skills, and then scratched my head in wonder as stuff died off so fast…thank you, thank you for continuing to educate us!
I’m happy to share, it’s fun! Don’t forget, I’m only learning, too. The stuff I’m doing seems for the most part to work out quite well—the veggies are good!—but there are always different ways and room for improvement! Once you get a feel for what’s going on, I think growing isn’t hard, it’s not so much tools and techniques, only keeping at it that really counts…!
Great tips on thinning! I always hate thinning. I wish I could just magically transplant the other seedlings without damaging the rest but I know that’ll never happen. It’s torture for me but I seem to muster enough courage to do the cut.
I feel like I’m often looking for interesting things to read about a variety of subjects, but I manage to include your site among my reads every day because you have compelling entries that I look forward to. Here’s hoping there’s a lot more amazing material coming!
Thank you for information, I just started arugula, and I’m new to leafy veggies in the garden. I’ve always been bad at starting seeds, but because I still haven’t cleared out my garden box outside (I’m still producing a lot of veggies in their, and I haven’t amended the soil in the box yet and thrown whats in their into compost). I had to start seeds inside this year I don’t have a lot of room so I’m using my window sill. Most the instructions on my seed packs talk about thinning and i wasn’t exactly sure how big the seedlings have to be before thinning them out. your site gave me most my information on when and how to thin. My arugula seeds popped in two days. I took 1″x1″ rockwool cubes * I now know i can cut them smaller* I sprinkled 4 to five seeds on top of each cube after rinsing off the cubes, I then used a very low drip of water from my sink to sink the seeds in barely to the wool. I put them in an old plastic container I had been saving from some bakery cookies at the store and I used my lizards heating pad to put under it. Put a little more water about 1/4 inch at the bottom of the container for some extra moisture, every cube had at least three ,half inch seedlings shooting out the top by day two. I then took 4 in x 4 in square pots filled them part way with soil placed the cubes and filled the soil around the cub and sprinkled a little soil on top. (leaving the sprouts sticking out)
So far this has been my most successful seed starting with seeds so small. then I moved my rockwool seedlings into the pots with soil on day three I cut all but one down after reading your post but I also have some seedlings on the rockwool that have popped tap roots and will hopefully eventually shoot up, then I can thin or not thin depending on how good or bad the one I saved from thinning the first time is, by the time those slower seeds pop. I hope I can take them all the way to my garden. I have more to start in pots today that are in the incubator I made. But thank you your post has helped me a lot. Next year i want seed starters like yours and maybe ill try and start them in soil again. its just the rockwool I had lying around this year and like I said Never had great success trying to start such small seeds in soil, never know when to thin!
Sounds great! If you don’t have one already, a regular spray bottle is handy, you can set it to the finest mist to water in new seedngs without disturbing the soil, and set to heavier spray and pull slowly to delicately water the tiniest just-emerged seedlings. And it’s always nice to spritz the seedlings if the air gets dry.
You can also try covering your newly seeded containers with clear plastic sandwich wrap, placed loosely on top so air can still get in. This can help a lot with germination. What I’ve been doing is explained here: Plug Sheet Action.
It’s totally fun once you start experimenting and making improvements to your own set-up, like you’re already doing. Very satisfying, indeed! :)
I really enjoyed reading this post, it looks fantastic! Great images also.
Your blog has some great ideas and its full of inspiration for growing your own vegetables at home. Plus its very easy to navigate around, and you have a number of great links and a great question & answer section.
Looking forward to more pictures on the progress of the lettuce and arugula. Keep it up!
Haleh, Perth, Western Australia.