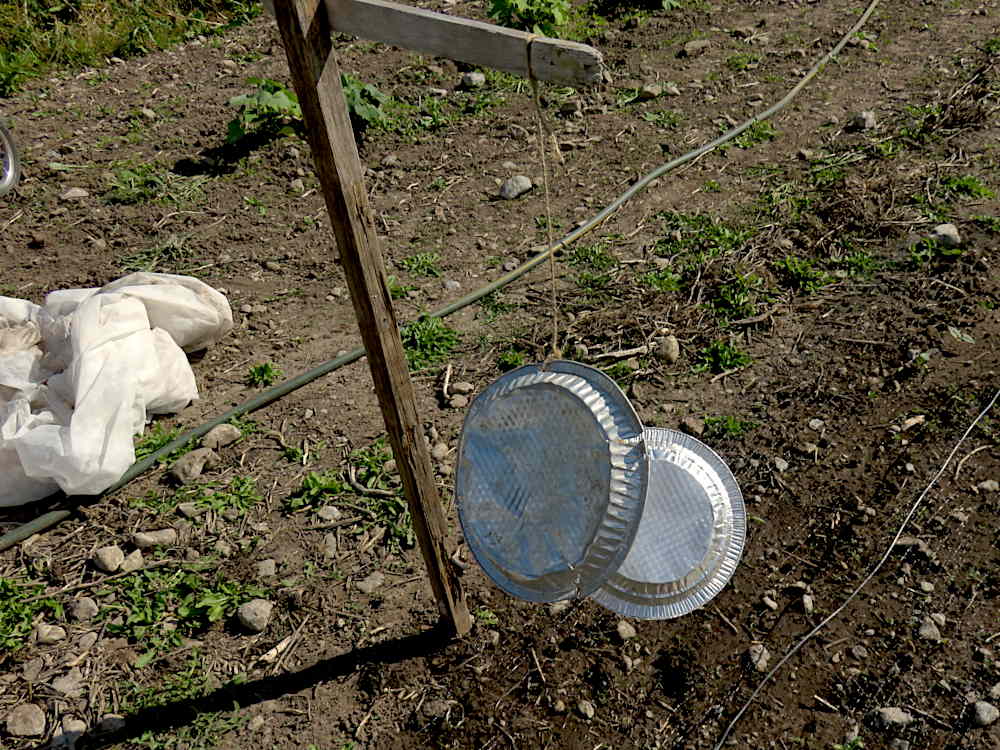
Wonder who spent the night here in the tall grass, so close to all those veggies. At least they stayed on the right side of the fence! It’s endlessly satisfying how that single white line and its steady pulse of intense electrical jolts have managed to keep the veg plot clear of deer. I can’t say for sure that’s what’s doing it, but deer are definitely all around, traveling through these fields, and they were a big garden forager before and during various lighter-weight fencing attempts. They only completely stopped devouring after that single line of defense went up. No electric fence guides I’ve read suggest just a single line, and yet, the plot’s been deer-free for years now. Can’t say the same for groundhogs, that extension of the electrical defense was a fair bit of work and a fail. But, still no deer!
Tools
Equipment for large-scale agriculture is too big or too expensive, and many home gardening tools don’t work efficiently on larger jobs or break easily. Tiny farming on plots up to two or three acres requires its own special gear…
Looking for leaks
Drip tape is a really fantastic way to irrigate: low-pressure, drop by drop, straight into the ground leaves no room for being blown off target or evaporated by a hot sun. Slow and steady. Peaceful. For years now, I’ve been set up with the tape and fittings to fully drip-ify an acre or two. And it’s really not expensive. Yet somehow, it’s never gone all the way. Whose loss, if anyone’s, I wonder. Instead, the crops have gotten by with natural rain, and in desperately dry times, it’s been dragging around hoses to water by hand, or deploy the water-wasting but quick and easy sprinklers. I have used drip for melons, because they really don’t seem to grow well without the extra ground heat of black plastic mulch, and drip tape underneath waterproof plastic is a perfect pairing. Still, haven’t always used it even there. This year, for the tiniest melon row, it’s drip tape deluxe. Eliminate leaks, then turn the water valves to low!
Pot experiment update #1
The story so far: Five days ago, 10 tomato seedlings, five each of two varieties, were potted up from the plugsheet where they started, to individual deep pots. The pots measure twice as deep as the cells, though they look taller in the photo. Pretty soon, all the toms will be transplanted at the same time, side by side, to see if deeper rooting leads to bigger, better, faster tomato plants. The ones in pots were also buried up to their seed leaves (that first pair that look like wings)—with their power of adventitious rooting, new roots will develop along the buried stem, so there’ll be a LOT more roots. The leafy parts look about the same between the two, while the real action right now is happening underground. In the plugsheet, roots are already circling around the cell walls. In the pots, it’s a root jailbreak, although they’ll find their new walls pretty quick. But walls that won’t be there forever!
Wind and more wind
At this point, end of month, I’d have to say WIND has been the weather theme of this May. Practically every day. Gusty enough to sometimes threaten the more delicate seedlings, and to put off ladder work on the big greenhouse. Here, the wind has blown off the garlic’s row cover. Not a problem as far as protection from the nocturnal leek moth horde that may be lurking, but more work to put back. Complicating this little matter, the garlic is growing up and straining at the cover, gradually pulling it out from being fully weighted by the rocks. Since the cover should stay on through June, that will have to be solved. Stay tuned!
Morning carnage
Weed tree, trash tree, table-eating tree, time to step back! Cutting back the invading box elder from the work table, using probably antique garden shears, the best tool at hand, seems kind of brutal, but this is tiny farming. The whole idea is to guide some space, some land, to your liking. It is kind of militaristic in nature, there’s no getting away from that! Take over, suppress what you don’t want, install what you do, and hunker down to maintain position. I’m kidding, of course, actually thinking about farming and gardening in those start terms is not helpful or enjoyable, IMHO, you layer on your framing and do what you have to do.
The garden shears only work well on the pencil-thick still-green upper stems, but that’ll do for now. Loppers—lopping shears, with long leveraging handles—would be perfect here, the tool for the job, though at the base this tree is probably a little past even them. So then, a pruning saw. I have neither, so a real saw, a sharp knife, and some bending and twisting may be involved for a proper cutback. Or, much as I don’t want to invest in a box elder battle, I’ll get ahold of a pruning saw. I wonder how much the roots can expand, year after year, without any leaves to feed them…
Bed prep: Step 1
Here’s a chunk of this year’s tiny veg garden, looking particularly rough in the harshly slanted evening sunlight. As unlike seeing for yourself as this photo may be, it does accurately capture the wild and not ready look of it all. Lush dandelion, prickly thistle and grass already starting to soar, mixed about with the dry dead stems of last fall’s overgrown then winter-killed weeds—that’s step 1 of hand-prepping the bed, completed. It’s not at all like what the rototiller on the tractor would’ve done.
For this first pass, I used the up-for-anything Valley Oak wheel hoe. It’s probably not intended for hacking through this sort of cover, even so, it does the job amazingly well, moving forward and pulling back, using both sides of the blade to slice through tough spots. The green, intact-looking plants have actually been cut off just below the soil level—a day in the sun and they’ll all be fairly dried out, shrunken and browned. Next step, raking it clear, then, another pass with the wheel hoe. Tomorrow!
Gushing is good!
A gushing water hose—nothing more normal and mundane wherever electricity for pressurized pumping, and of course WATER, are in plentiful supply. This tiny farm is in such a place, yet the gushing hose signals something much happier, an elevated event, because it’s proof positive that the dug well that irrigates the field is back in action once again after another frozen winter.
Priming the pump is usually a mid-May thing, when freezing is over. The operation is simple enough: slowly pour a couple of gallons of water into the pump so it backfills the pipe that goes into the well, turn on the pump, and wait for it to catch. It may take two or three top-ups and retries. When water gushes, the pump is primed for the season! It’s not foolproof, though, the pipe could’ve gotten hopeless clogged, or the well-used and dilapidated pump and tank could decide to give up a seal or conk out entirely. Then the simple would likely become costly repairs or replacement. But not this time!
Details! If the irrigation fittings look small, they are indeed. I’ve seen photos of irrigation set-ups on big farms that are full scale waterworks, orderly grids of giant pipes. Here, the setup is a 1″ plastic pipe that snakes above-ground out into the field—it’s the disconnected part on the left. The pipe can be this small because it’s only meant for low-pressure drip irrigation, hand watering by hose, or a few sprinklers at a time: not every day, all crops, all the time. Also, a dug well like the one here doesn’t have an endless water supply, you don’t want to get ahead of its reservoir size and replenishment rate. Finally, the longer the pipe, the lower the pressure the closer you get to the end. Here there’s about 400′ of it, and you can notice the pressure difference at each of the taps spaced along it. It’s not geared to intense large-scale production, instead, a low cost way to connect a fairly distant water source to a thirsty veggie plot when there’s the need!