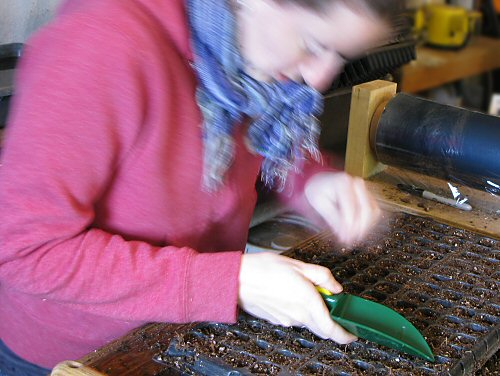
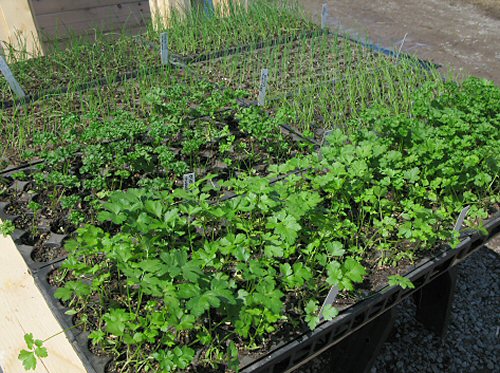
A gray and gloomy, windy day…but WARM. Well, fairly above freezing for the most part, and with a little rain, yesterday’s speeded-up melting continued. But we’re still a ways off from actually doing any work in the field. So, another pretty laid-back day. Lynn came by for her weekly installment of tiny farming. Out in the greenhouse, moving tables around and some hand-watering (those barrels of snow water are coming in handy!). In the Milkhouse, more seed starting: 400 more tomatoes, and a tray of leeks (a little late for this batch, but still better than direct-seeding). For her very first time starting seedlings, Lynn seeded 19 varieties into a 200-cell plug tray (10 each, 20 of one). Clearly, I trust her…accuracy. Working in the tiny cells, changing seed every row, and keeping track of names requires a bit of concentration. A little wandering attention, and who knows what tomatoes would be growing where… Living on the edge! :)
Month: April 2008
Chickenhouse progress
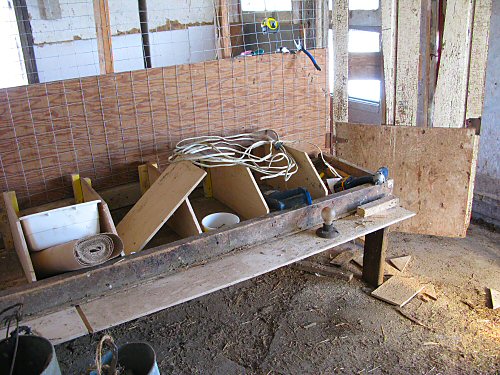
Work on the Chickenhouse has been moving along. It’s not a huge job, but all of the little bits and pieces take time, including foraging through the barn and drive shed for material to recycle. Here, you can see the bottom of the new door between the main sections, for baby meat birds coming in a couple of weeks, and the mature layers, due in June. And there are six new nest boxes. Most of the boxes I’ve seen in photos have a top, which I gather is partly to discourage roosting on the walls and the subsequent crapping into the nests. But I’m fully deferring to Bob’s design, based on his decades of all-around farming. He says it shouldn’t be problem. For me, I’ve been doing my chicken reading and chicken chatting, but it’s mainly learn as you go with Bob in the lead on this one!
Jack the Miniature Donkey has been amiably hovering around, checking out the construction with his head stuck in the door. Here, he’s hanging close to the Chickenhouse even when no-one’s home. The chickens will soon be his neighbors. He’s a friendly fellow, also quite territorial, and he can kick, so he ought to be good for protecting that flank! All in all, I’m really incredibly excited. I guess the city guy in me is still in there looking out… ;)
Spring comes Saturday!
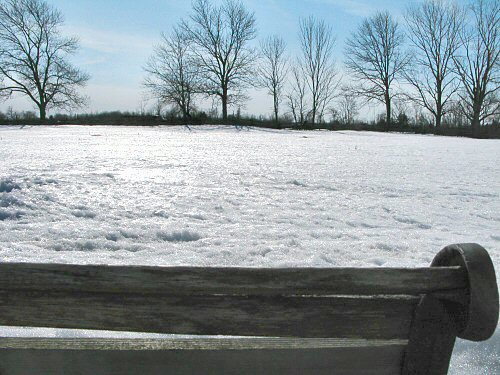
Proper spring begins Saturday! I’m positive. Meanwhile, here’s today’s barren view from the bench, facing west, just outside the greenhouse. After a long summer’s day working in the field, this is the place to be to watch the sun go down… Coming soon!
Herbs return
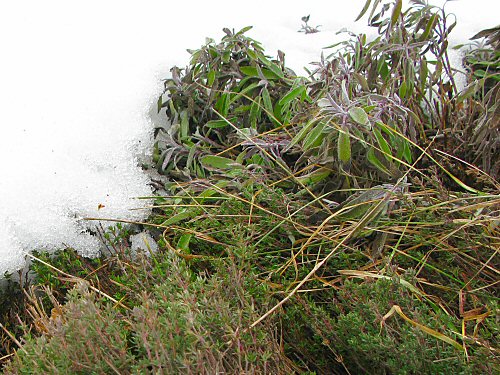
Sage and thyme don’t look like much as they roll out from under the snow, but they’re good to see. Another chilly day, slightly above zero, but COLD. Still, the sunny days lately have been heating things up, and the snow is slowly receding. It’s pulled back from around the greenhouse, and it’s starting to retreat over the herb patch (that’s sage and thyme at the far end). The REAL melt-off starts tomorrow…!
Ah, SPRING!
Man, what a difference a day and a bunch of degrees can make! The temperature didn’t exactly shoot up, but it went from hovering around daytime zero, to around 10°C (50°F). This was one weather trend, predicted on the 15-day-forecast weather site, that I figured wouldn’t suddenly go south (it’s gotta warm up sometime), so I’ve been waiting for it, to the day, for a couple of days now. It’ll get steadily warmer for a week or so, than maybe drop a bit, but even if we get another BLIZZARD, the ground will have warmed up enough that new snow won’t be able to stick around for long. So, I do believe, SPRING IS HERE!!!
I woke up to sunshine, and without even checking the temperature or confirming the forecast, set up a table outside the Milkhouse and out went the leek, onions and parsley for a little rapid hardening off. Getting them out to the greenhouse in a couple of days will free up a lot of rack space!
Wandering around the field a bit, checking the melt-off’s progress, I poked around the edge of the Jerusalem artichoke bed. The ground was still fairly frozen, and had melted to clayey muck only in spots. Poking around in a soft spot at the base of one of the plants, I came up with a handful! First harvest! The tubers look beautiful, the ones in the front of the pic about marble size, the biggest in the back, like a golf ball. As seed stock, there’s going to be a ton from the 45 pieces planted last year. I didn’t end up harvesting any in the fall; now, I’ll get to for the first time eat ’em!
Liming the Chickenhouse
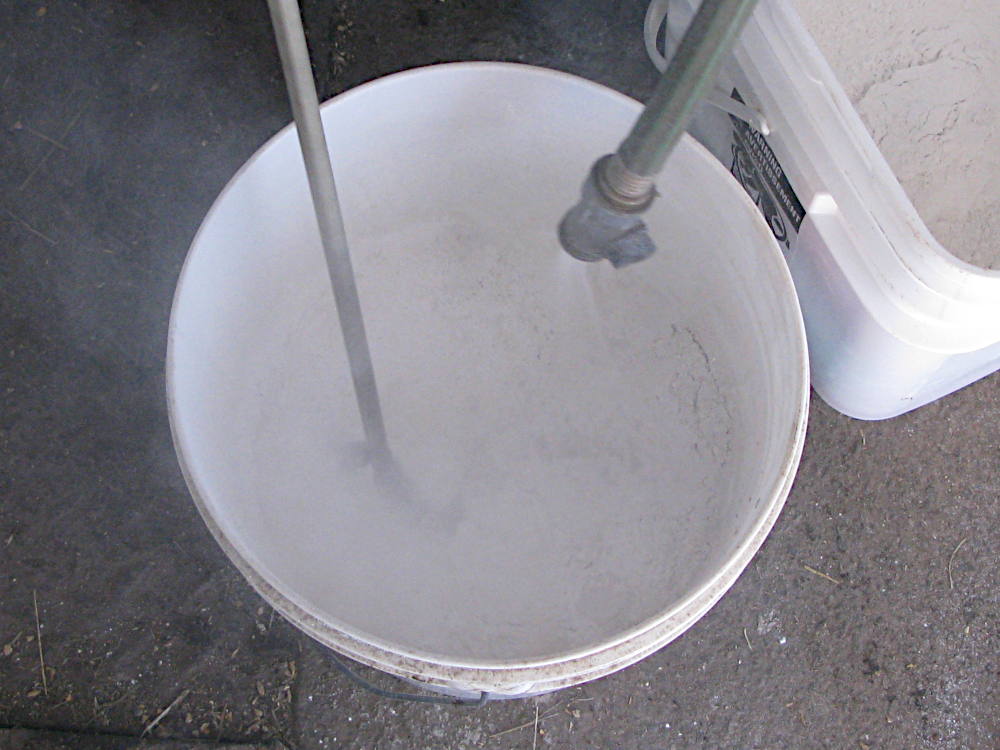
Whitewashed the meat bird half of the Chickenhouse today, using the traditional purist blend of nothing but hydrated lime and water. This is an old school farming standard from Bob, completely new to me.
The lime is a very fine powder that comes in bags. Mixing was easy. A power drill mixing attachment churned it to a thickness a bit lighter than regular paint, and then on it went with big brushes.
The lime is a bit caustic, so wearing a mask when mixing, and gloves and goggles to avoid splatter, is a good idea, although I didn’t this time around (and I did take care not to inhale clouds of lime dust!).
Afterwards (it’s follow Bob’s lead), I did some reading and, not surprisingly, was quite amazed: yet another simple, inexpensive, effective approach that’s been complicated (in this case, into the costly world of high tech paints and sealants).
Classic lime whitewash disinfects, repels insects, and preserves by sealing surfaces and wicking up water. It dries to an opaque white that beautifully reflects light to brighten up dim spaces.
It’s also safe for animals (which, yes, includes us humans, lime can even be used in chicken litter to keep it dry).
There are lots of applications, interior and exterior, for wood and masonry. It’s not as permanent as oil or latex paint, will rub off a bit, and needs to be refreshed every year to keep it in top shape.
It’s also INEXPENSIVE: a 50lb (22.5kg) bag was about $7, and you can mix up at least 15-20 gallons from that, the way we used it. That means you could whitewash an entire small building, inside and out, for maybe $20! For big jobs, a sprayer would make it real easy.
You can tint it, and there are also various recipes that include alum, salt and other additives that may improve adhesion, but the tried-and-true basic is just lime and water.
And you need hydrated lime (calcium hydroxide), NOT dolomitic lime nor calcium carbonate, aka garden lime (both are recommended for raising pH in garden soil). We got ours from the feed store.
I’m not sure how popular this sort of whitewashing is these days, but it’s certainly still used, and a few decades ago, this was a standard type of paint. Anyhow, it looks and sounds great, and we’ll see how the chickens like it!
WHICH LIME? Use hydrated lime (calcium hydroxide Ca(OH)? also called builder’s lime, mason’s lime, slaked lime, or high?calcium hydrated lime). Don’t use agricultural/garden/barn lime (crushed limestone, calcium carbonate, CaCO?), dolomitic lime/dolomite (magnesium?calcium carbonate, roughly CaMg(CO?)?), hydraulic lime (variable composition, often containing silicates and aluminates), or quicklime/burnt lime/caustic lime (calcium oxide, CaO—dangerous to handle, boils over explosively, causes chemical burns). The right hydrated lime works out no problem.
Field wakes up…
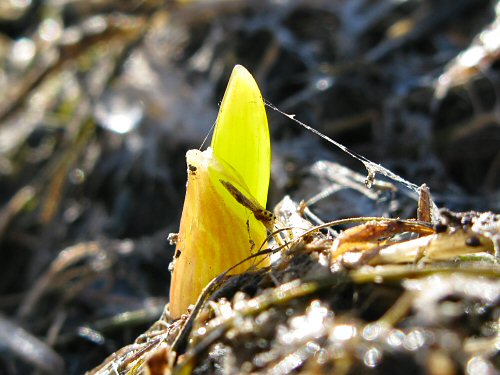
There’s a kind of magical moment between winter and spring, as the snow rapidly disappears and the water runs off. It lasts only a couple of days. Unusual sights are everywhere you look. I watch it closely every year, but this time around, with the blog-and-camera habit by now well-ingrained, I’m appreciating it more. I found garlic earlier than ever, only a few hours after emerging from months buried under snow with little or no light. The color is odd, I’m used to GREEN, but they look healthy, so I guess they need some sunlight to put on a little color. At the lower, south end of the field, the melting snow runoff gathers in a giant puddle, 40 or 50 feet (12-15m) across at its widest, and a few inches deep. This field has good drainage, so the puddle doesn’t stick around long, shrinking by the hour and vanishing entirely within two or three days. This year, the residue of the oats cover crop added a bit of a surreal dimension, as a bleached gold beach, and wavy underwater like seaweed. When you focus tightly and think miniature (like a kid would!), it’s a crazy little inland sea-for-a-day… All over, the little details of melt-off, looked at up close, are entirely odd and gone soon…