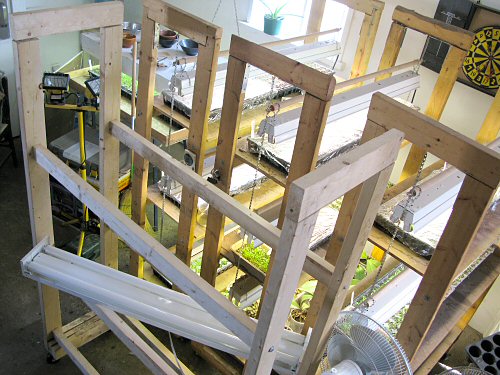

New lumber turns into new grow rack. This adds a fourth to the set, a measure of tiny farm growth. I started with two in Year 1, built another one last year (Year 5). It’s not like the focus here is on rapid expansion…this is the speed of staying tiny! ;)
Although I don’t build these often, it seems to get quicker every time. Well under a hundred dollars of wood, wheels, screws, bolts, brackets, hooks and chains, plus a chop saw, a drill and a couple of hours, and there it is! Light fixtures are extra. In the pic, the shelves still have to go on.
Lying across the middle supports is one of the four old fluorescent fixtures, given to me instead of being tossed in the trash. Not only free, they’re BETTER: these are the overhead lighting type you see in (horribly lit) offices, the tubes are spaced farther apart than in the standard shop lights I’ve been using, the light will spread more evenly over a larger area—for the seedlings, a lot less leaning and stretching…


great racks :) staying tiny is good strategy for keeping the profile :)
I love the design your useing. Seems like your able to get a ton of sprouts going in a relatively small area. I don’t grow for market, but this is something that is definitely on my garden todo list as I am in a winter climate as well. Reuseing the lights is great too!
P~
hi mike! love these. what are the measurements?
hyd: It’s from a plan in Rodale’s Illustrated Encyclopedia of Gardening and Landscaping Techniques (a book worth having). It’s 1.5’x4′, and around 6′ high. At some point, I’ll take some close-ups and put up measurements…
I thought you’d be interested, or could at least appreciate this. I was able to salvage two beautiful dual tube flourescent light fixtures from a remodel at my day job. The lights are the 4 foot type, and the fixtures not only come with concaved highly reflective backing, but are set approximately 12 inches apart. Does this sound like a good spacing to you? I assumed that wider was better than narrower.
Wasn’t planning on these, but now I will definitely be set to plant next spring even earlier.
P~
We used your grow racks as inspiration to build three for our seedling room at the Richmond Fruit Tree Sharing Farm. Instructions for construction are posted here:
http://richmondfoodsecure.blogspot.com/2009/02/build-your-own-seedling-rack.html
P~: Twelve inches sounds interesting. The wider-spaced ones in the photo here are on 5″ centers. They work noticeably better than the closer-spaced shop lights, just about perfect for single 11×21 trays lengthwise. But I double up as the number of seedlings increase, putting four trays per shelf (pushing it, I know, but they don’t stay there for long), and then, a lot more spacing would come in handy! I didn’t check to see how they worked out for you last season, if you posted about them. I’ll take a look!
Karen: That’s great! I posted the link to your building guide in tinyfarmwiki.com!!! :)
I’m thrilled to see so much discussion about energy efficiency, whatever the opinion. As an energy-efficient lighting vendor I’ve found the best method of increasing awareness is simply informing my consumers about the latest products. The fact is that when they purchase energy efficient CFL or LED light bulbs they do see the savings on their energy bills. There is a lot of discussion about government mandates and whatnot; while this does benefit my business, I think simply selling the newer bulbs on their own merit is the best way to go.
Thanks,
James Paul
Superior Lighting Dot Com (http://www.superiorlighting.com)
Where did you get your grow lights, Mike? We need some!
Very Nice!
I plan on building something very similiar this week.
Great job on the blog I will follow it now that I found it.
Keep up the good work!
Looks great the food must taste good to.