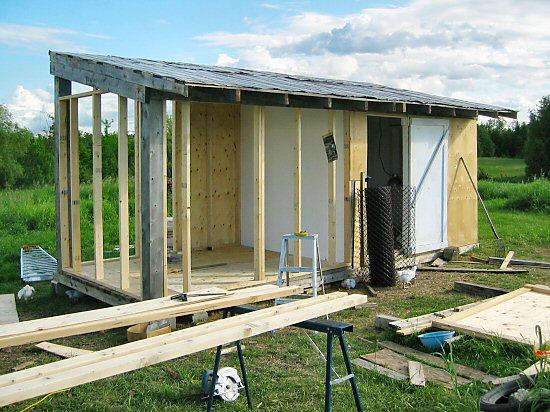
First day of summer, and the day before the arrival of 25 20-week-old, ready-to-lay Shaver Red Sex Link CHICKENS. Clearly, time to begin building out their new home. It shouldn’t take too long! :) Working on and off through the day, the frame went up, and by early evening, the plywood flooring is down, the door is built (on the right) and even a first plywood panel is up. A little more work tomorrow, and we should be good to go. No problem!
lumber
People at work: hoophouse goes up!
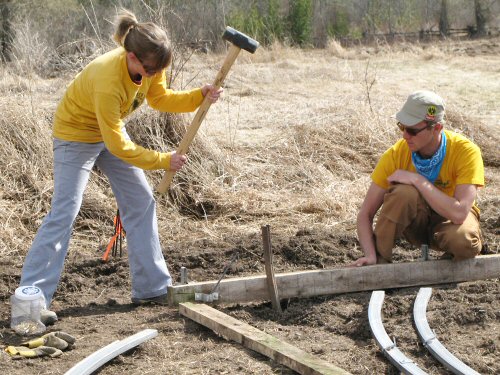
Another beautiful and busy day in the field, with Lynn, Mel, Jordan, Tara and, for her first full day, Andie, all variously raking, tilling and building. And eating lunch (can’t wait for proper farm food to kick in!). The most VISIBLE accomplishment today: we put up the frame of the hoophouse, which is the main part of the job. This was mostly done by Andrea and Jordan, first-time building for both of them, with me holding hoops, furnishing tools, and starting them out with some how-to advice. Working with light, pre-formed metal is particularly satisfying, things can go up fairly quickly, to produce dramatic results (or maybe it’s just me, waiting for that greenhouse!!!). It seemed like the satisfaction at the end was pretty deep! :)
Screwing the hoops to the ridge is the main structural task. We used the bucket on the Kubota compact tractor as a raisable platform…
Since this is a re-assembly job, all the parts and pieces were there to be…assembled. First, lay out the 4×4 base, and pound in eight 3′ (0.9m) iron T-bar stakes to anchor the hoophouse. The T-bar is attached to the wood with lag bolts. Pounding was relatively easy, the ground is still soft, but a little bit of a workout. And if you look closely, near Andie’s foot and Jordan’s knee, you can see the brackets that the hollow steel hoops fit over, at 4′ (1.2m) spacing…
Next up, starting the frame. Attaching the first two pairs of hoops to the ridge is the trickiest part. The hoops slip over stubs in the ridge, then they’re screwed in place. A cordless drill and a couple of wrenches were all the tools we used. It’s wobbly at first, the more hoops you add, more stable it gets!
And there we are! Andie tightens up nuts on the cross-braces (purlins). In front, the lumber for an end wall is layed out. Halfway there. All in a tiny farm day’s work…
The great WARM outdoors!
Ahhh, yes, THIS is what warm weather feels like! For the first time this year, the temperature topped 60°F (15°C), with a hazy sun and a gentle breeze. We’ve had some melt-off days already, but this one tastes like spring! Usually, there’s a day like this sometime in February, so it’s been a long time coming, and makes me wonder how even crazier the rest of the weather will be. No worries…today feels great.
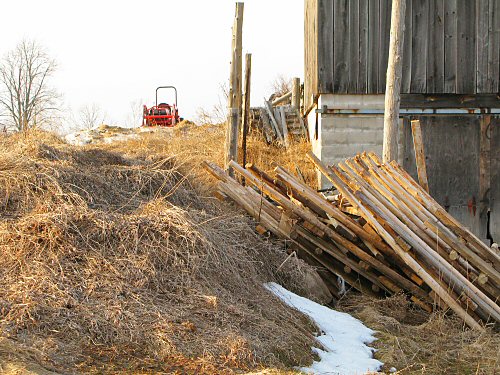
The photo is a good to-do list for when real spring comes and the ground is dry enough to work and get around on. There’s a jumble of spare lumber taken from the barn when we cleared an area for the new seedling room—it needs to be sorted and stacked, and some of it will be the new chickenhouse! (Only patches of snow are left on much of the land, but I’m sure it’ll be back before it’s really gone.) The abundantly overgrown grasses that partially surround the barn and border the moldboarded garden areas is a big clean-up job. And, up the slope, the Kubota compact tractor calmly waits for after the hired-big-tractor disking and the compost spreading, when we do the final tilling of the garden beds. Coming soon. Cool!
Hoarding wood like gold

Calling it scrap lumber doesn’t do any pile of spare wood justice. On the tiny farm, you always make space to accumulate someday useful stuff that elsewhere might get tossed. Waste not, want not! This collection of old fence boards, rough cut cedar planks, odds and ends of 2×4’s, and other bits will piece by piece have its day. Meanwhile, it needs to be moved to a more sheltered spot, raised off the ground, before the snow really comes in. Today seemed like a good day to do it…
Rack built
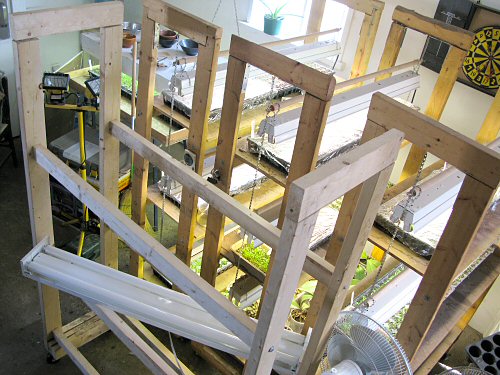
New lumber turns into new grow rack. This adds a fourth to the set, a measure of tiny farm growth. I started with two in Year 1, built another one last year (Year 5). It’s not like the focus here is on rapid expansion…this is the speed of staying tiny! ;)
Although I don’t build these often, it seems to get quicker every time. Well under a hundred dollars of wood, wheels, screws, bolts, brackets, hooks and chains, plus a chop saw, a drill and a couple of hours, and there it is! Light fixtures are extra. In the pic, the shelves still have to go on.
Lying across the middle supports is one of the four old fluorescent fixtures, given to me instead of being tossed in the trash. Not only free, they’re BETTER: these are the overhead lighting type you see in (horribly lit) offices, the tubes are spaced farther apart than in the standard shop lights I’ve been using, the light will spread more evenly over a larger area—for the seedlings, a lot less leaning and stretching…
New lumber
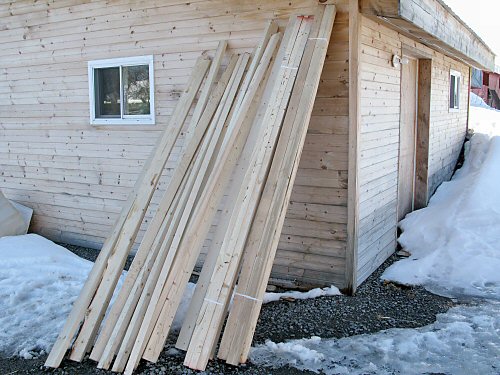
Went through the lumber delivered yesterday, selecting the straightest pieces for a new grow rack. There’s all kinds of scrap wood around the farm, except, there are never enough 2x4s and plywood… I order construction grade for most things, quite inexpensive but the boards have to be hand-picked if you don’t want a lot of warped wood. For rough carpentry, this works fine: the savings add up, and rough edges add character! There’s the grow rack, a double screen door for the Milkhouse, the composting toilet-ice fishing hut conversion, the chickenhouse reno, new tables and trays for the farm and market stands, more… All needed pretty soon. Spring building starts now!
Rough carpentry
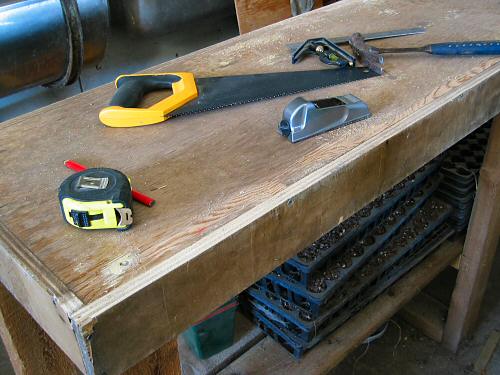
Added a shelf to the potting table today, a quick bit of rough carpentry. It also needs a couple of coats of varnish to waterproof it for the season, so I took the time to shave down the little edge where the sides join the tabletop. Normally, I wouldn’t bother with a minor detail like that, but I spotted the cool little surform plane (the blade is kinda like a grater) in one of the toolboxes and felt like using it! Rough carpentry may sound like nothing much, but it’s really a particular, essential skill of its own on the tiny farm. I’ve been learning as I go. The “rough” doesn’t mean sloppy or shoddy, just practical: functional, sturdy, simple construction, as much as possible using whatever materials are at hand, and not waiting around to get things done. Need a shelf over here? A workbench fit in right there? A couple of quick walls to turn a corner into a storeroom? A roof on the veggie stand? Grab the tools, hunt down the materials, and bang it up!
The simple shelf is a couple of 1×6 boards. It’s for keeping plug sheets handy when I’m seeding lots of trays of transplants at once. The potting table started out as a long, shallow bin, built from scraps of plywood, to hold harvested tomatoes. I later reassigned it: flipped it over, added legs, and voila! (There’s that trusty saw again.)