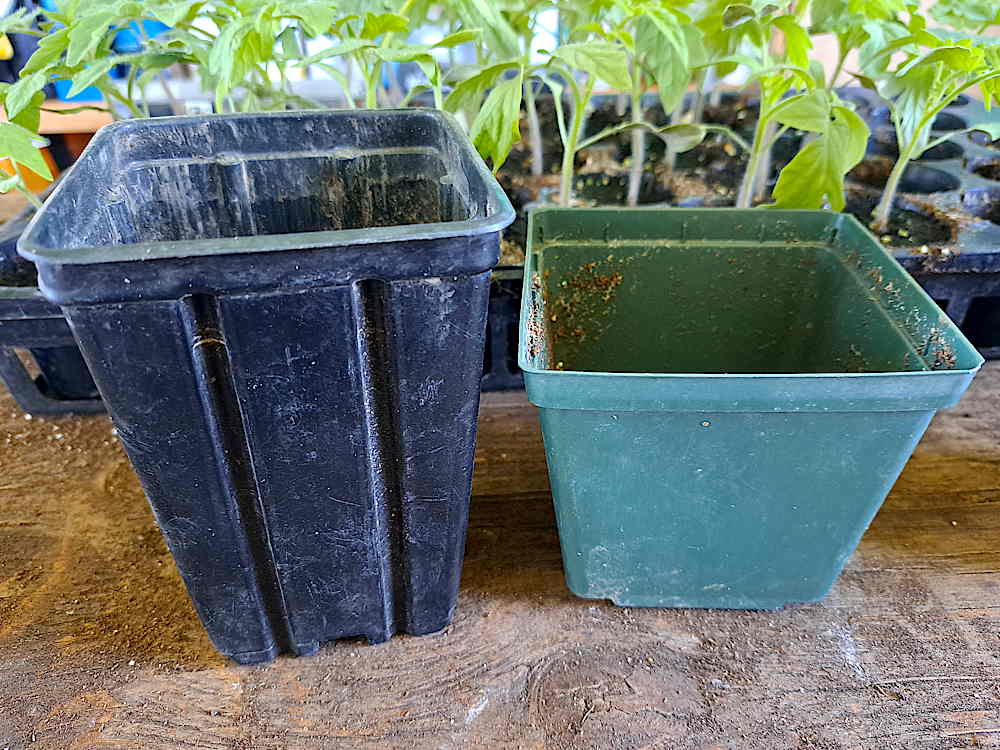
Attack of the leek moth

Leek moth larva eating garlic plant

Checking for scapes today, only a couple of days after the last all-good garlic check-in, and found absolute carnage thanks to a leek moth invasion. For years, I’ve heard about these voracious leaf devourers ravaging alliums—garlic, onions, leeks—in the general region, but they’d never shown up here. Until now. After hours of hand picking and squishing, the situation may be somewhat under control.

FACT-FINDING: I did a bit of quick research to get the bigger picture. Leek moths (Acrolepiopsis assectella) are nocturnal, operating in full darkness. They overwinter in plant debris, emerge and mate when the temperature gets up to around 50°F/10°C. There are usually three generations a year, around here in mid-May, June and July. The first generation grows up (fast, in around 3 weeks) and starts laying another round, and so on.T hat means, in unusually warm or cold weather, there could be more generations per year, or less. Each female has around 100 eggs, lays them singly not in clusters, usually on the underside of leaves near the base of the plant (but, naturally, look EVERYWHERE!). There’s of course lots more, but that’s what I need to know for veg protection—garlic under row cover (and it would be pretty safe to uncover them during the day).

Winter squash green

Winter squash leaves

Broad, fast-spreading, richly green winter squash leaves, especially in their first few weeks, are kind of the emeralds of the vegetable patch. They’re poster plants for healthy garden growth. Unfortunately, that charm is hidden under row cover until they get well-established, to protect them from cucumber beetles. At flowering time, the cover comes off so bees can feed and collect pollen, and pollinate in passing all those future butternut and acorn squash. Here, with the cover pulled back for hand watering and a bit of weeding, you can see how squash do a great job of self-weeding by creating lots of shadow that keeps the competition down!

Establishing peppers

Transplanted peppers settling in

Pepper transplants, backlit by the late afternoon sun, are still looking quite pale and somewhat fragile, but upright and healthy, after a couple of weeks. This is the veg garden equivalent of the suspenseful, hold-your-breath-before-the-big-reveal stage that happens here in June. Transplants and directly seeded crops are showing steady growth, but impatient eyes find it…slow. I think of it as the creep phase. I first heard the gardening “sleep, creep, leap” rule of thumb to describe, not vegetables, but how bamboo transplants get established. First year, nothing to see as they set down roots. Year two, some modest growth. Then—ta-da!—in year three, they shoot up. While none of the veggies in this field follow that three-year plan, I find myself thinking that way about how the crops grow over the season. Waiting for the leap!

Down the garlic path

Path between garlic beds

As a foot tall (30cm) version of myself, I can imagine strolling down the straw-mulched path between garlic beds, under the arch of slightly menacing leaf blades, stepping over dandelion leaves and dodging thorny thistles—the weed intruders—while admiring the thick garlic stems, with their promise of good-sized bulbs in a few more weeks. At this point, what could go wrong?! Sure, steady heavy rain over two or three days could leave the ground waterlogged and the garlic soaked and ruined for storage. It’s happened to me before. Call it a leap of faith, but I don’t think that will happen, not this year!

Plug sheet gamble, part 2

Transplanting green onions

Only a few days after these green onions emerged, they’re in the field and heading into the ground. Haha, there’s no doubt this is a lot more labor intensive than using a seeder. Unless the weather conditions are really extreme, like a long, hot drought with scorching daily temperature and bone dry ground, it’s hard to argue for the plug sheet approach. But not impossible. Let’s see how they do…

IN THE PHOTO: A sharp and critical eye will notice that the seedlings in the tray seem pushed up against one side, instead of satisfyingly centered. This was my error, watering them in with a spouted can, along with a bunch of other seedling trays sitting outside. Onions don’t quickly put out lots of secondary roots that spread through the seedling mix and hold it together. Instead, at first there’s mostly just the radicle, that long white root that comes out of veg seed, heads down and, for most other vegetables, also branches out. So the plugs got kind of soupy and the force of the water pushed the onions to one side. You can see one hanging over the edge because it stuck more to the drainage hole in the cell than to the plug of seedling mix. Details! I should have remembered to use a shower.

Wheel hoe underdog challenge!

Wheel hoeing the field

It doesn’t sound like a fair contest, the wheel hoe going up against the tiny tractor, but that’s the experiment underway this season. With all the rain recently, weeds are primed to surge. So far, it’s mostly thistle and clumps of grass itching to expand, with pigweed, lamb’s quarter and a couple of other regulars starting to emerge. This area, not yet planted out, has already been hoed, but that haze of green won’t stay down for long. A matter of days… With the 48″ rototiller on the tiny tractor turned by diesel horsepower rumbling like a tiny tank, it’s easy to put things off a bit. The tiller will churn up whatever’s in its way in no time. This fine wheel hoe has instead only an 8″ blade and a lone human…pushing. Every little bit of growth makes the going harder. The time to get in is early, when the blade can more or less glide smoothly and evenly, and you can move travel up and down with fair ease. There are other things to consider here—time, fuel, effect on the soil…more on all that as the experiment goes on—but timing is number one!

IN THE PHOTO: The wheel hoe is facing a strip that has just been walked. It’s hard to see the line between hoed and unhoed, especially compared to the cleanly erased path left by a rototiller. The weeds are sliced just beneath the soil—like cut flowers, they still look fine. Give ’em a day, especially a sunny, hot day, to dry out, and the difference becomes clear. Weeds, gone!