Spot the tiny farm!

Rototilling on the Kubota

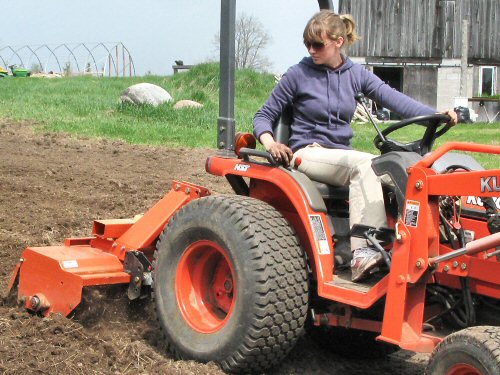
What’s in a photo? Depends what you’re looking for! Take this pic of Andie, rototilling today with the Kubota. Pretty straightforward: woman, machine, field. BUT, can you spot practically  EVERY main part of a really tiny farm (at least, of this one), represented right here?

It’s mostly hand work, but there’s some gear: Of course, we have the Kubota compact tractor, flagship of an motley assortment of gear specifically suited to tiny farming. It’s rugged, very much a diesel TRACTOR, but small, and designed more for the big estate crowd than agriculture. Around here, though, it’s the workhorse machine, a people multiplier with its bucket and essential 48″ rototiller. As far as I know, rototillers aren’t core gear on tractor farms, but it’s our ONLY field implement so far, a huge labor-saver over walking up and down with the walking rototiller, or digging by hand. And the turf tires seem to work just fine.

New people diving in: And then there’s Andie, doing (tiny) tractor work within the first few hours of her entire market garden experience. (It’s cool that she’s already looking over her right shoulder, it’s a classic tractor farming pose—except maybe not with GPS?) She also has DIRTY HANDS on the wheel, from checking out the tilling results, and they’ll stay dirty as she moves off the tractor in a few minutes, on to hands and knees to plant onions.

A big shed (aka barn): A barn of some sort is the main, sooner-or-later essential, working structure that separates clear land from a working tiny farm. Really, a basic barn is just a big, all-purpose shed  (this one, 20’x32′, is pretty tiny, just four walls), for getting things out of the weather. You use it to store harvests and gear, and to work out of the wind and rain  (and of course, we have winter). With rough carpentry, you remodel and reconfigure it to fit: an extra hook here, new door there, closed off room in a corner, whatever you need!

Lots of work, all day long: Elsewhere in the pic, less obvious but clear signs of tiny, labor-intensive veggie growing.  In front of the barn, tables of seedlings are hardening off. They’re brought out in the morning, taken in at night, back and forth, back and forth. That’s because the greenhouse (hoophouse frame on the left) isn’t finished yet. And THAT’s because there is just SO MUCH TO DO ALL AT ONCE. Like, mow the grass for mulch, before it gets outta control. And get a new battery for the John Deere riding mower (on the top left), so it can haul around the trailer loaded with whatever we need to get LOTS MORE STUFF done. It all weaves into one big picture of tiny, simple, interdependent tasks that go on and on and on, all day long…

It can get a little intense, but it’s also really fun, if you don’t get all grim and serious about it and try to tie in the state of the entire planet (try to stop following the news!). You get to pretty much see where you’re going. Meet people in a really interesting way. Eat well. Sleep well. Kinda…simple! I think that’s a pretty good start…
Mixing and repotting

Filling peat pots

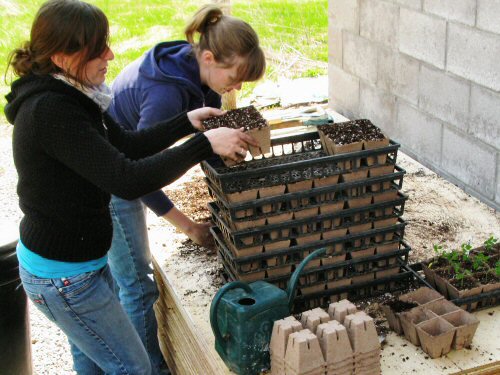
Today’s featured task: potting up tomatoes from plug sheets to 3″ peat pots. As with many things here this season, this is a little later than usual, by a week or so, as the new farm set-up gets squared away. (It should all even out sometime in June.)

This batch of seedling mix is about 50% compost, 25% peat and 25% perlite. Lynn and Andie did the blending on top of a stack of 4×8 plywood, using a shovel, and hand-crumbling clumps of peat and compost. With a little experience, it’s easy to judge a mix by squeezing it (or you can just follow a recipe exactly), but a fairly foolproof test, when using compost or soil, is to water-in a loosely packed pot: if the mix collapses into a muddy muck, you need (lots) more perlite/vermiculite/peat. Water should flow through leaving things still kinda fluffy.

Between tomatoes, peppers and eggplant, we’ll end up with maybe 900 potted-up transplants, aimed for the field in about three weeks. I’d decided to stop using peat pots this year because you have to keep buying them (they’re planted with the seedling). BUT: it’s so busy, there was no time for soil blocks, hadn’t had a chance to find a supplier for reasonably priced, small bulk quantity (reusable!) plastic pots, and we found an inexpensive peat pot supplier in town (they’re usually ordered and delivered), so it’s peat once again this year…

People at work: hoophouse goes up!

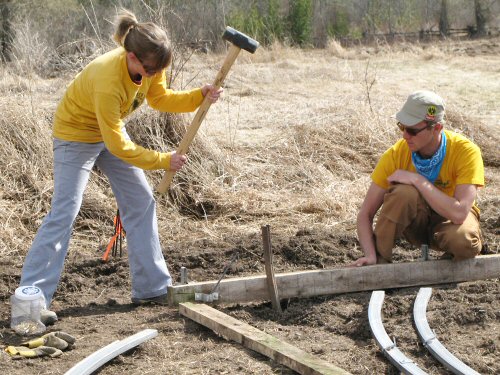
Another beautiful and busy day in the field, with Lynn, Mel, Jordan, Tara and, for her first full day, Andie, all variously raking, tilling and building. And eating lunch (can’t wait for proper farm food to kick in!). The most VISIBLE accomplishment today: we put up the frame of the hoophouse, which is the main part of the job. This was mostly done by Andrea and Jordan, first-time building for both of them, with me holding hoops, furnishing tools, and starting them out with some how-to advice. Working with light, pre-formed metal is particularly satisfying, things can go up fairly quickly, to produce dramatic results (or maybe it’s just me, waiting for that greenhouse!!!). It seemed like the satisfaction at the end was pretty deep! :)

Screwing the hoops to the ridge is the main structural task. We used the bucket on the Kubota compact tractor as a raisable platform…

Since this is a re-assembly job, all the parts and pieces were there to be…assembled. First, lay out the 4×4 base, and pound in eight 3′ (0.9m) iron T-bar stakes to anchor the hoophouse. The T-bar is attached to the wood with lag bolts. Pounding was relatively easy, the ground is still soft, but a little bit of a workout. And if you look closely, near Andie’s foot and Jordan’s knee, you can see the brackets that the hollow steel hoops fit over, at 4′ (1.2m) spacing…

Next up, starting the frame. Attaching the first two pairs of hoops to the ridge is the trickiest part. The hoops slip over stubs in the ridge, then they’re screwed in place. A cordless drill and a couple of wrenches were all the tools we used. It’s wobbly at first, the more hoops you add, more stable it gets!

And there we are! Andie tightens up nuts on the cross-braces (purlins). In front, the lumber for an end wall is layed out. Halfway there. All in a tiny farm day’s work…

Soil inspection

A sunny, still chilly, fairly busy outdoor day. Did some test tilling this morning, with the Kubota compact tractor and 48″ rototiller. The solid ground hasn’t fully thawed out, but the plowed area is already nearly 50°F (10°C) at 6″ (15cm) deep. So I thought I’d have a go on a 30′ (9m) strip, to see how well it’d chop up with the Kubota.

The full plan is for disking—big plow, big tractor—by Peter down the road. That would break up the moldboarded strips, finishing up with the little (but mighty!) Kubota. But between the weather, and unexpected things happening, you never know when a date with off-farm machinery will fall through.

I want to get the early stuff—spinach, garlic (yes, have to try spring planting this year), onions and so forth—in as early as possible. So we’ll probably be prepping an area with just the Kubota.

In the afternoon, Andie (aka Andrea, aka Max) dropped by for the first time, to check things out. She’s finishing up school, and planning to spend a couple of days a week for the summer, learning about small-scale farming the hands-on way… We strolled around, Andie tried out some seed starting with a tray of arugula, and we chatted.

Everyone’s first visit to the farm is a bit different, and there are all kinds of reasons why people want to get out in the field. This time, a good deal of the conversation involved university, graduate studies and the like, along with…tiny farming. It’s good to have an idea of who you’ll be working with, both ways—a comfortable, interesting fit really makes a difference in the tiny farm experience!

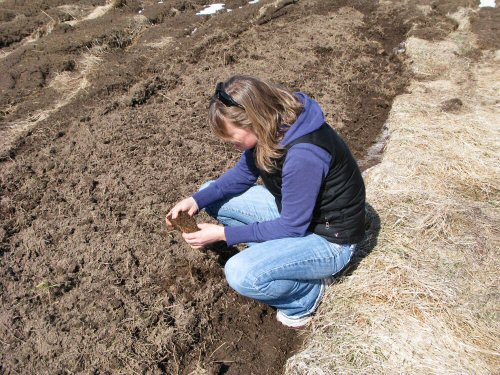
This season, there’s a bit of a blog plan: to show a lot more of the people side of the market garden! Today, as often happens, I forgot to take photos while we were actually doing stuff, so right at the end of her visit, Andie checked out the freshly rototilled ground, and I snapped an official Her Day 1 pic. The soil looked good, it’s a clayey loam (pretty much like at the old farm), with the sod breaking up nicely, and Andie seemed happy with the prospects, so we should be checking in again with both real soon! :)