All posts tagged with "riding mower"

Spot the tiny farm!

Rototilling on the Kubota

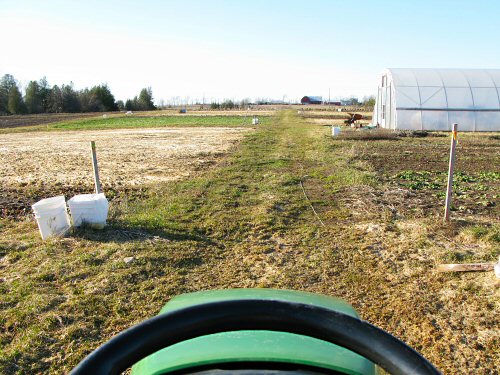
What’s in a photo? Depends what you’re looking for! Take this pic of Andie, rototilling today with the Kubota. Pretty straightforward: woman, machine, field. BUT, can you spot practically  EVERY main part of a really tiny farm (at least, of this one), represented right here?

It’s mostly hand work, but there’s some gear: Of course, we have the Kubota compact tractor, flagship of an motley assortment of gear specifically suited to tiny farming. It’s rugged, very much a diesel TRACTOR, but small, and designed more for the big estate crowd than agriculture. Around here, though, it’s the workhorse machine, a people multiplier with its bucket and essential 48″ rototiller. As far as I know, rototillers aren’t core gear on tractor farms, but it’s our ONLY field implement so far, a huge labor-saver over walking up and down with the walking rototiller, or digging by hand. And the turf tires seem to work just fine.

New people diving in: And then there’s Andie, doing (tiny) tractor work within the first few hours of her entire market garden experience. (It’s cool that she’s already looking over her right shoulder, it’s a classic tractor farming pose—except maybe not with GPS?) She also has DIRTY HANDS on the wheel, from checking out the tilling results, and they’ll stay dirty as she moves off the tractor in a few minutes, on to hands and knees to plant onions.

A big shed (aka barn): A barn of some sort is the main, sooner-or-later essential, working structure that separates clear land from a working tiny farm. Really, a basic barn is just a big, all-purpose shed  (this one, 20′x32′, is pretty tiny, just four walls), for getting things out of the weather. You use it to store harvests and gear, and to work out of the wind and rain  (and of course, we have winter). With rough carpentry, you remodel and reconfigure it to fit: an extra hook here, new door there, closed off room in a corner, whatever you need!

Lots of work, all day long: Elsewhere in the pic, less obvious but clear signs of tiny, labor-intensive veggie growing.  In front of the barn, tables of seedlings are hardening off. They’re brought out in the morning, taken in at night, back and forth, back and forth. That’s because the greenhouse (hoophouse frame on the left) isn’t finished yet. And THAT’s because there is just SO MUCH TO DO ALL AT ONCE. Like, mow the grass for mulch, before it gets outta control. And get a new battery for the John Deere riding mower (on the top left), so it can haul around the trailer loaded with whatever we need to get LOTS MORE STUFF done. It all weaves into one big picture of tiny, simple, interdependent tasks that go on and on and on, all day long…

It can get a little intense, but it’s also really fun, if you don’t get all grim and serious about it and try to tie in the state of the entire planet (try to stop following the news!). You get to pretty much see where you’re going. Meet people in a really interesting way. Eat well. Sleep well. Kinda…simple! I think that’s a pretty good start…

Comments (6)

Field day!

Winter-killed brassicas

Left to the last possible harvest in the fall, brassicas like kale, Brussels sprouts, cabbage, broccoli and cauliflower (above), were eventually winter-killed and now have to be cleaned up—one of the first field-readying jobs of spring! Today, I started. (EVERY day is a field day from here on in, through November at least, or the first heavy snow that sticks.) A day of tiny farming fieldwork is really just a whole lotta gardening… Now that the ground has dried out enough to be tillable (that could’ve been yesterday, but…errands and CHICKENS), and warmed up enough to direct seed the crops that germinate in cooler soil, it’s a whole new world of things to do…and think about doing. There are two basic ways to ponder the progress of the season’s garden: by timing and by area, each useful in its own way. Timing is mainly about the plants: when to seed, when to water, when to harvest. Area is about where to locate particular plantings, which in my case doesn’t mean absolutely running out of space, since there’s lots more field to expand the garden into if I wanted to (which I don’t), but more like where to position stuff efficiently, so you’re maintaining crop rotation, but not having to, say, drag hoses all the way down the garden to a couple of newly seeded beds that need daily watering in (although there’s a field production plan made up, there are lots of adjustments on the way—where to put stuff will come up again and again!). So, the start of the season is mainly about area, because you have to prep beds and get veggies in in a rough order—cool soil seed, then cool weather transplant, then warm soil seed and transplants—and the timing is a constant: it’s all right away! One way I keep overall track of this garden is by counting sections: it’s about 2.5 acres, divided into 40 50′x50′ squares (each fits 10-16 beds, depending on width). At some point in the next six weeks or so, almost all SHOULD be planted out, nearly 40/40. Today, I started seeding in one…

Rototilled

Tilled and untilled: Partially composted cow manure was spread and incorporated in the fall. Now, a light rototilling to prepare for seeding is all that’s needed. Today, I used the tiller on the Kubota compact tractor.

Rock stuck in tiller

Rock beats tiller: There are lots of stones in this field, they work their way up continually, and even a fist-sized rock, caught in the right way, can stall out the 48″ rototiller on the Kubota (it’s a tiny tractor!). No problem: remove and restart.

Garden gear on trailer

Getting set to seed: I work mostly one or two sections at a time, prepping an area with the tiller, marking the beds, then seeding (or transplanting). This way, I can get the crops that need to be started in as quickly as possible. Here’s the cart towed by the riding mower, loaded with assorted seeding gear (and some transplants being ferried to the greenhouse).

Measuring up the garden

Making beds: Oh, there’s A LOT of tiny farm history behind my bed marking methods. :) I’m still working on the most efficient way to set up beds. Right now, it’s fairly streamlined, involving a 100′ tape measure, stakes, and pacing off distances. This year, I’m planting in 3′, 4′, and 5′ beds (that’s path included), depending on the crop.

My favorite rake

Customizing the Rake: Every season, I re-ink faded measurement markings on a couple of hand tools I use the most. Here’s a convenient mark for 42″ from the top of the handle (that’s the planting area width for a 5′ bed. There are other marks further up the handle, and the whole rake is exactly 5′. It’s convenient for quick checks, especially on the favorite rake that I use for touching up beds right before seeding. And so, off we go…!

Comments (8)

Head out on the highway…

Riding mower into the field

A couple of days ago, things seemed to be moving in slow motion, today, it’s the wide open highway! (A poor analogy, perhaps, given the soaring price of gas, but anyway…) Sitting at the wheel of the little riding mower, heading to the greenhouse down the main path with trays of seedlings in tow, a warm sun shining down, a good part of the field just about ready to work, all the possibility of a brand new garden season ahead, and no weeds in sight felt…really fantastic. With a nice adrenaline rush! As the warm weather kicks in, there’s a whole series of winter-to-summer changes, and my body memory of fieldwork details starts to come back. It’s not like I’ve been doing this forever, each new season, there’s a spring ramp up of remembering routines, pathways, ways to do a thousand little things. Last week, I moved the Kubota compact tractor and the riding mower out of winter parking in the drive shed, to make room for summer storage. The greenhouse is now almost completely set-up for full seedling mode. Today, I test started the Horse walking rototiller and walked it around, set out the rain gauge, stripped off the draft-sealing duct tape to open the Milkhouse side door (a milestone spring moment!), and hooked up the hose from the barn well to the pipe that runs down the field and supplies the greenhouse (the hose goes through one of the holes at the bottom left of the door). Practically overnight, there is SO MUCH TO DO, RIGHT AWAY. There’s tons of tilling as soon as possible so the cover crop residue can start breaking down, and immediate seeding of, at least, peas and spinach, in the next couple of days of sunny weather, before the big rain forecast for Friday and the weekend. And CHICKENS should be here tomorrow… Fun!

Milkhouse side door

Comments (4)

Welding

Repairing the mower deck

A second incredibly warm and sunny day, perfect for a little welding in the barnyard. Yesterday, something kinda disengaged in the riding mower deck, leaving behind a pretty nasty racket and nearly no mowing action, and now the deck is getting a long-overdue overhaul.

Hitting rocks in the field can’t be reasonably avoided. After four years of pounding, the spline on one of the pulley assemblies that spins a blade was completely worn down and the whole thing had to be replaced. We picked up the part this morning, and an hour later, the mower was back in business. Here, Bob welds on a washer to patch a cracked mounting hole (he’s brazing, which is a type of welding, or high-heat soldering, depending on how precise you want to get…it’s all joining molten metal to me!).

DIY repairs keep the tiny farm rolling. I can do routine minor repairs—splicing hoses, replacing tines, sealing tire leaks, sharpening blades, re-priming pumps, basic rough carpentry, banging on things until they work, and the like—but welding is still far in the distance. Welding is great. We should all learn to weld, right away…! :)

Comments (6)

Making mulch, part 2

Bringing in the mulch

Working just ahead of more rain, Conall (fighting a cold that’s knocking people out around here—farmers can’t get sick!) and I raked the mini-windrows of grass and alfalfa into little mounds, piled it on the trailer, and dumped it in the greenhouse to finish drying. In the week since it was mowed, there was enough rain here and there to keep it damp, which wasn’t in the plan. Oh, well. A grass catcher for the riding mower would be the time-saving mechanical approach. This was a lot more fun, quite relaxing, a couple of hours well spent. Now, let’s hope it’ll dry, not rot!

Comments

Making mulch

Grass and alfalfa cut for mulch

Yet another experiment: making mulch from some of the hay that grows alongside the garden. The hay, originally alfalfa and red clover, is dying out, and what’s left is mainly grass and alfalfa, currently around 10″ (25cm) high. I cut it with the riding mower, which instead of scattering the clippings, leaves a convenient tiny windrow. A couple of days drying in this year’s hot October sun, and it should be good to go. I tried thoroughly dried grass clippings as mulch a couple of years ago on a few tomato plants, and it worked out well, so on to a larger scale. This crop will be used on the garlic, to be planted in a month or so. The mower is sadly in need of new blades, so the cut is rough, but it should work out fine.

Comments (1)

TFB & the Web

Locations of visitors to this page

Free PageRank Checker

website uptime

Best Green Blogs

Home and Garden Blogs - Blog Catalog Blog Directory

Download Firefox