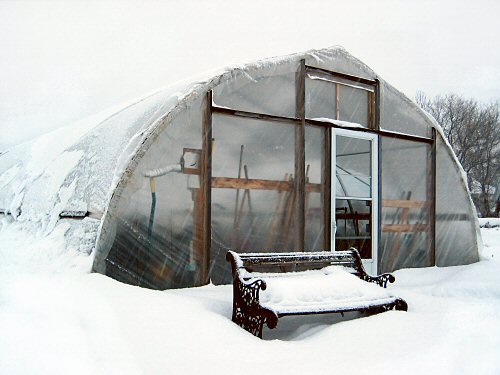
We haven’t gotten a really heavy single dumping of snow so far, but it’s coming down steadily every couple of days and the weather’s staying cold, so there’s build-up. That means increased vigilance on the greenhouse front. The right combination of freezing, a little thawing, and more snow can stick heavy slabs of ice on the hoophouse plastic. It usually slides off, but the weight can build up quick, so I check. If things were to get really weighty, besides removing the ice, I’d have to support the whole thing on the inside by wedging wooden beams under the ridge. I doubt it’ll come to that. And there’s the build-up around the base, some sharp shards of fallen ice could have puncture potential, none so far. AND THEN, this is going into the fifth year for the plastic. The special 6mil hoophouse covering is UV-resistant and rated for four years, so round about now, it’s time to look out for signs of fatigue and disintegration. I haven’t seen this before. I imagine it’ll start tearing at exposed pressure points, the way regular plastic shreds or tears under slight pressure after a while in the sun (well, in the UV, sun or not). I should ask around. The west-facing side, with the door in the picture, is most exposed to really battering winds that occasionally sweep across the fields with not much of a windbreak nearby. (It took me a season to get over being amazed that the hoophouse was still standing after bad storms—I’d actually head out in the howling wind in the middle of the night to check!) So, the usual winter greenhouse watch is on, upped a little. (I should drag that bench inside…)
Tools
Equipment for large-scale agriculture is too big or too expensive, and many home gardening tools don’t work efficiently on larger jobs or break easily. Tiny farming on plots up to two or three acres requires its own special gear…
The Drive Shed
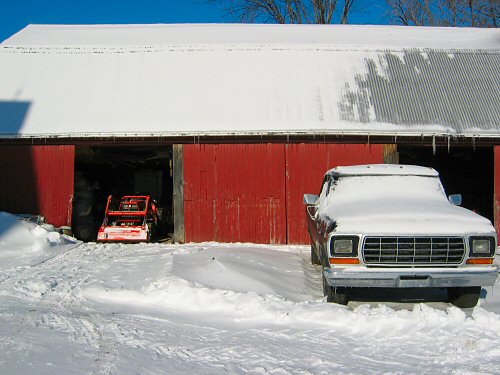
Finally got the tiny tractors in out of the weather. The diesel Kubota took hours and some warming and recharging to get started (I should’ve put ’em in sooner, but I wasn’t believing in the COLD). You can just make out the John Deere riding mower, parked sideways and in for the winter. The Kubota I fire up every few days to keep it limber, and it goes on snow clearing outings, mainly to make paths to the greenhouse. Unheated and uninsulated, the Drive Shed is still the place to be for machines in the cold! This version was built in the 1940s (here’s a view from the other side, it’s sticking in on the left), and like most things on the farm, has quite the history of…uses. All manner of vehicles, probably in the hundreds, have been stored or repaired here: tractors, cars and trucks, dirt bikes, snowmobiles, buggies and sleighs (that’s a 1977 Ford F-150 pick-up on the right, slowly being repaired by Bob’s son, Robert). The upper level is quite huge. It’s now mainly crammed with parts and pieces—assorted useful “junk”—but back in the day, a pulley system raised and lowered a wooden platform (it’s a manual, open elevator), and as the seasons changed, the farm’s various horse-drawn carts and buggies would be swapped up and down with sleds and sleighs for different purposes. Now, they’re long gone—one sleigh and no horses remain—but maybe they’ll be back!
Machines and snow
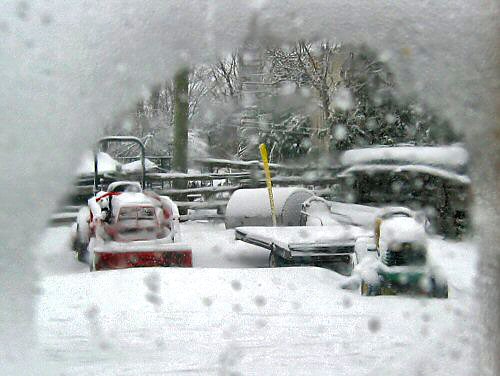
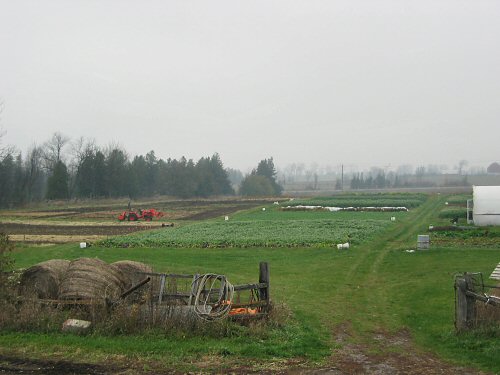
Looking out the side door of the Extended Milkhouse, this is what I see. The mighty tiny tractors don’t seem too formidable under a little snow. A good old fashioned blizzard and they’d be…gone! A few years of crazy short winters, and it’s easy to forget how different the seasons used to be around here. Not that long ago, 15-20 years, winter meant a whole new ground level, with permanent snow at least two or three feet deep settled in for the duration wherever it wasn’t plowed. Now, it’s practically a novelty. I can hardly believe I’m not exaggerating… Well, there may not be as much snow, but winter’s still coming, and I’m still going to have to soon finish cleaning out the drive shed to put the machines away…
Compact tractor tricks
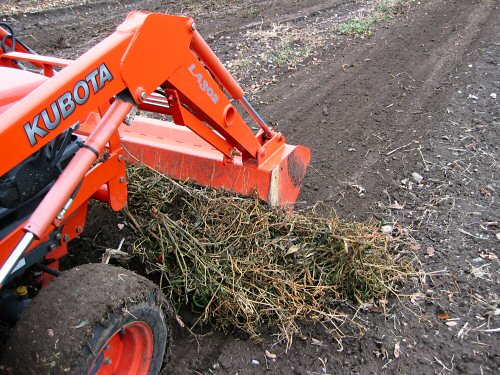
For some reason, I always feel a little guilty when I use the Kubota compact tractor in ways that make things way too easy. For instance… Probably the worst is the clearing technique I came up with a couple of years ago when it was cold and hand work was going slow. If you set the bucket of the front end loader pointing nearly down, and drag backwards, you can completely clear old plants in NO TIME AT ALL. Here, I’m removing a 50′ bed of hot peppers in one pass (the sweet peppers, in another section of the field, were lower growing and got tilled under a couple of days ago…). Is this gratuitous soil compaction, driving the machine over the beds unnecessarily? Well, maybe. But it’s so QUICK, and not an all-the-time thing. Does it drag off valuable topsoil? Not if you start feathering as you go, lifting and lowering the bucket a few inches lets the tangled mass of plants roll, freeing the soil. I try to do most clearing by hand, but sometimes, well, you take the shortcut…!
More fall finishing
Fall clean-up is moving along bit by bit between the weather. Half the field is cleared, fertilized, and tilled or about to be. The rest is mostly covered by oats and a little rye. The Kubota compact tractor is ready to take up where it was stopped yesterday by the broken rototiller chain. At this point, I have an hour or so before the rain…
Rototiller breakdown
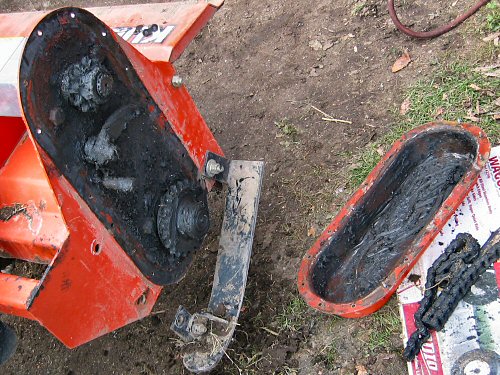
Like machinery everywhere, gear on the farm tends to break down just when you need it. This may be obvious, but it’s no less annoying for it!! Some breakdowns you know are coming sooner or later, like when you decide to let it wear out rather than fix it at the first signs of trouble. This you can avoid with regular maintenance including INSPECTION—checking things out for looseness and wear always eventually pays off—but often I, uh, don’t get around to it (as with, recently, the riding mower). Most breakdowns are, at least on the surface, sudden failures, like today, when in the midst of tilling with the 48″ rototiller on the back of the Kubota compact tractor, the tines suddenly stopped turning. This had happened once before, so the diagnosis was easy: broken chain. And that’s a good one. Every time something breaks and we fix it, I stock up on extras of whatever was used in the repair—DIY repair and a good selection of spare parts go hand in hand on the tiny farm! So, for the chain, there are parts: full links, offset links, master links. A replacement chain is also quite cheap and a good thing to have on hand. This particular repair job is dirty but extremely simple and straightforward, same as for a bicycle chain. Pop off the chain guard, scrape off the excess grease, bang out the rivets on the broken links and add new ones, or decide to replace the whole thing, put the chain back on…it’s about as simple as that, and you’re back in the saddle again!
Making mulch, part 4
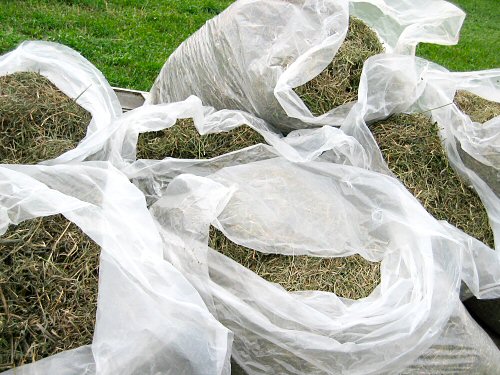
Fat bags of kinda fluffy grass-and-alfalfa mulch are the satisfying end of this little experiment (well, the real end comes next spring when we see how it does at sheltering the garlic for the winter). For this second batch, the bags are actually step 2, not part 4: I eliminated the greenhouse drying stage by letting the cut dry in the field and bagging it on the spot (which was always the plan—cut, wait, bag—the first time was just a bad weather thing). A small but to me really satisfying part is reusing those big clear leaf bags. We go through at least three or four new ones almost every week of the market season, for fresh cut spinach, mesclun, and other greens. They’re used once, and then I’ve been saving them for the last three years for JUST THIS PURPOSE! It’s great to see your plans materialize, right before your eyes!! Little things, big pleasure…