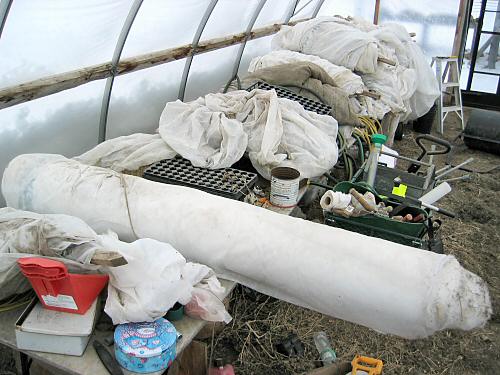
The greenhouse is small, and the layout hasn’t really changed in its three full seasons. A row of tables on the north side are where the seedlings go. On the south side, unshaded by the tables, is an open strip, about 8’x32′ (2.4x9m), where I pursue ever earlier lettuce, trying to have something for the very first farmers’ market of the year (it’s the first Saturday in May; last year’s second Saturday is the earliest so far). It’s a simple set-up. Still, every year, there’s one day when I head out there to assess the clean-up requirements and plan what to do. This year, today was that day. A lot of different gear gets stored on and under the tables. It varies each year. Here, it’s mostly floating row cover, kept up off the ground because, apparently, voles don’t like to climb (voles gnawed a hole through a good part of a roll one year…very annoying, imagine unrolling a neat row of ragged holes). Exposure to UV from the sun is not good for plastics particularly, and I do store most things in the drive shed, or the Milkhouse and barn, or under the tables, but things do get left out… Anyhow, this year’s action plan is settled: clean up!
Tools
Equipment for large-scale agriculture is too big or too expensive, and many home gardening tools don’t work efficiently on larger jobs or break easily. Tiny farming on plots up to two or three acres requires its own special gear…
Grow lights, on!
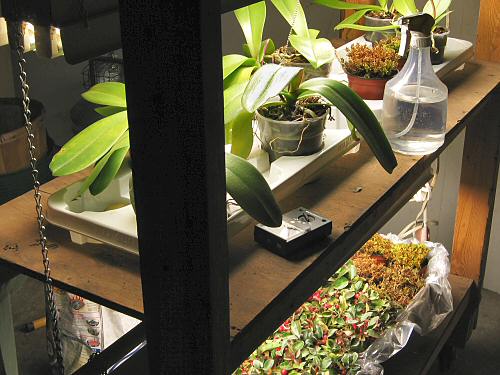
Grow rack lights went on today for the first time this season. They’re only for the rescued houseplants (orchids, wintergreen, heather)—I guess every plant deserves a place in the sun—but, I’ll be starting super-early lettuce soon, a month earlier than ever, for an experiment in planting them out to the greenhouse at the beginning of March. Getting the grow racks ready is another familiar routine. In early summer, I remove the fluorescent light fixtures and the chains and dowels they hang from and store ’em somewhere (last year, it was on the new Big Shelf). For spring, I dust them off, wipe them down, hang them, and a new seedling season begins!
The Big Shelf
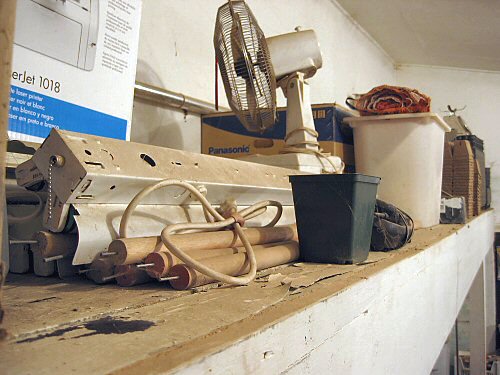
The choice storage spot for tiny farm gear, especially during winter, is this giant shelf, where it’s warm and dry. It’s at the back of the Extended Milkhouse, the last 3-1/2′ of the old ceiling, propped up on the leading edge by a beam across and 4″x4″ posts. It would maybe qualify as an upper level, if you could actually stand up: clearance is only 3-4′ under the new sloped ceiling. It’s 3-1/2’x20′ (1mx6m) of up out of the way space…a big shelf! About 7-1/2′ feet high, I get up there by ladder. Only one season old, it’s still startlingly clear, orderly, and almost entirely filled with immediately useful stuff as opposed to sure-to-be-useful-sometime gear (though the inevitable packing boxes saved just in case of return already have a presence). It’s dusty up there. At this end are the many fluorescent light fixtures (12, I think) for the grow racks. They hang from chains from those dowels in front, and the dowels in turn hang by the nails from more chains on the rack! When seedlings are all done, I remove the lights and use the racks for harvest storage. The oscillating table fan is used to give newly emerged seedlings a bit of a toughening up, conditioning breeze. Down at the other end, stacks of 3″ peat pots and plug sheets and trays. Time to start seedling room set-up!
Temperature gadget
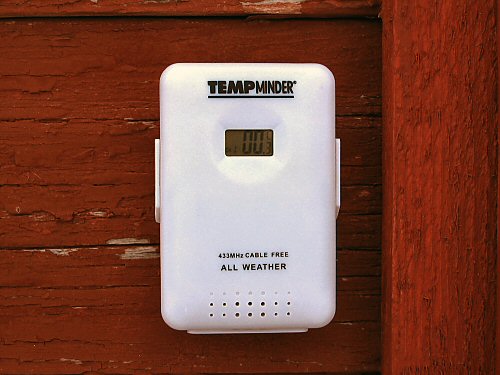
This wireless remote temperature and humidity sensor sits outside, beside the side door to the Milkhouse. Here, it’s reading 0.3°C. Precise! I’m not overly thrilled by technology, but some gadgets I like. Like digital weather stations! They’ve become really CHEAP in the last couple of years. A local hardware chain just stocked a house brand, indoor/outdoor (dual measurements), min/max (stores highs and lows until reset) thermometer/hygrometer (humidity) for 10 bucks! I started tiny farming with a plain old analog min/max thermometer, until the digital ones got cheap about three years ago. Plus they had humidity. I got one, but it soon broke (didn’t like the greenhouse heat and humidity, I guess). The next generation of cheap weather stations had outdoor sensors. Cool! I got two for the greenhouse, one for the seedling room, and they’ve lasted. But, the remote sensor (a bonus!) is on the end of a long wire that I never got round to running… Now, there’s cheap and WIRELESS. That’s REALLY cool. More units, more batteries, but it’s WIRELESS. I banged in a nail and hung it out there in three minutes. It sends temp and humidity to a neat little unit sitting by my computer. It doesn’t store min/max wirelessly, that one’s not as cheap until probably next year. Instead, I glance at it quite often. The remote isn’t protected from direct sunlight, so the highs are too high when the sun hits it, but here it’s on the east side of the barn, so only the morning reading is off… Why do I need real-time outdoor temperature for tiny farming? Hmmm… It’s been just above zero days and most nights lately, and THAT’s interesting? You mightn’t have noticed otherwise that everything is slowly MELTING… Though really, watching the temperature through the day is kinda like watching the balls spin on a lottery draw: it DOESN’T REALLY MATTER! So maybe this wireless thing is yet another clever, largely unnecessary…gadget. I still like it: it’s 32.6°F outside the door, three days to the New Year, and seeds start soon! :)
Brussels sprouts for Christmas?
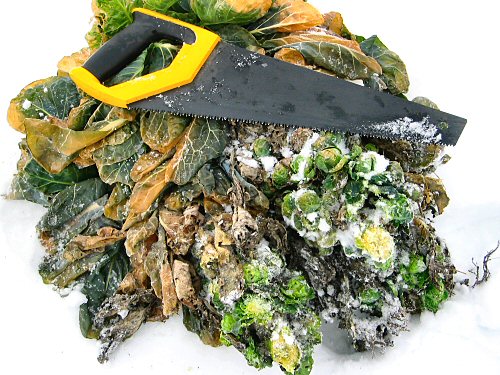
Got the idea this morning to get something REALLY FRESH onto the Christmas dinner menu. A fat local turkey, plus squash, potatoes, carrots, beets and onions from storage (in addition to a ham and industrial veggies from the supermarket) didn’t seem quite enough. But what could I find? The bed of Brussels sprouts left standing when the snow hit was…still there, not fully buried, and possibly perfectly preserved in a frozen state. Remembering a harvesting lesson of the past, I headed up the field with short, stiff saw in hand and bagged three (once again, the saw did its stuff!). Unfortunately, between the snow and the leaves, the sprouts were too well-mulched and probably never really got frozen solid, or at least, froze and partially thawed a few times. Many were damaged and discolored, but some were definitely…fine (I tasted a few raw on the spot). In the end, between the rather unappetizing, damp mass in a bucket waiting outside the kitchen, and all the other cooking to do, this time around, the good sprouts never got sorted, and it’s on to the frozen compost heap for the lot. But there’s more out there for another try… This is not exactly part of the Professional Market Garden side of tiny farming, more like my personal garden-addicted behavior, but it’s all part of learning!
Stakes vs cages

Every year so far, there’ve been two or three major projects that I’m sure just HAVE to be done. They’re usually EXPENSIVE (at least, expensive in the world of tiny farm finances!), which means, they take some thought. We’ve had the seedling greenhouse, excavating the pond, the Milkhouse Extension, the tiny tractor, the first full-time field hand (Conall!), and a few other steps… So far, so good. For the coming year, I have in mind a few more…important upgrades. I was reminded of one of them in the drive shed today, where the stakes used for my semi-effective semi-sprawl method of tomato support are stored, along with some of the couple hundred (largely useless) home-style tomato cages. For a while, I was dreaming of moving up to the basket-weave method—lots of twine and…weaving—although I have a hard time picturing all of that suckering getting done. What I REALLY want is BIG CAGES made from concrete reinforcing mesh…but it seems so expensive. Rough pricing: about $7 a cage times 500 cages, plus a fair bit of labor setting them up and taking them down. I know the method works well, but will it work well HERE, this year? Is it worth the money? For the same cash, I could almost build a second, production-size greenhouse. Or put more into drip irrigation. Or build a cooler for better short-term storage. Come to think of it, does growing dozens of varieties of tomato really make sense, couldn’t I just sprawl two or three big, round red varieties that would be easiest to sell…? In fact, I could grow a lot more of a lot less, cut out many varieties and entire crops, concentrate on the trendy best sellers, and get on the waiting list for an upscale farmers’ market in the big city. Top dollar! Maybe try for a bank loan for a bigger tractor (hey, there’s more acres in the garden field!) and a refrigerated truck?! If this is a (tiny) farm business, that seems to make sense: GROW! Yet somehow I’m heading in the OTHER DIRECTION. Stopping the city CSA to go local. Trying more crops and varieties every year and figuring out ways to buy stuff for them, like big tomato cages… It seems so…contrary. Which, in tiny farming, is something I guess you gotta like!!
Calendars love catalogs
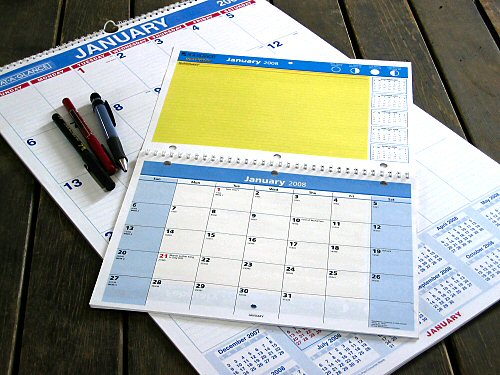
I got these about six weeks ago, when the selection was good (because, just any calendar will not do!). Today, I busted them out of their plastic. It’s only three weeks to the new year, the Holidays will vanish in a blur as they always do… I don’t know if it’s the new extra focus that comes from garden BLOGGING, this year’s extended Real Winter, Garden Season SIX coming up, or merely some planetary alignment thing (or…something else), but I am really, well, unusually EDGY and wanting to get started… Hmmm. Anyhow, the calendars…
It comes down to record-keeping. You read about all kinds of intense systems of garden notes and, from market gardeners, intricate planting schedules distilled from reams of precise planting data. I started out with all that in mind, recording every crop and variety by planting date on a map, and meticulously noting all the action in a pocket notebook (use waterproof ink, field notebooks in your pocket inevitably get SOAKED…forgotten in the laundry or otherwise!). This note-taking activity would trail off a bit as the season got underway, and more so over the years…
Now, I’m a minimalist when it comes to records, and this season’s system is the simplest yet. Almost everything worth noting goes into these two fabulously FRESH calendars. And there they are! Like the new seed catalogs, for me, new calendars in December hold all the promise of things to come…!
Details! Well, these aren’t just any calendars, they’re At-A-Glance brand calendars. Like any other tool, when you find the right one, nothing else will do.
I’ve examined and tried all kinds of free and commercial calendars (and notebooks, and journals…) and there’s always been something missing, something slightly WRONG. Then I discovered the large-format AAG, which I’ve been using for the past three years. It is…just right. I tend to get distracted and a little messy when it comes to field notes as the season progresses, and a simple thing like not having enough space to write in can throw things off. The AAG large wall calendar gives me ample, uncluttered room for every day of the week, and a crisp, matt surface to write on. And it doesn’t get lost. I hang a pen on twine from the same nail and it’s set. Perfect!
The little AAG I found this year. It’s the ideal companion to the wall calendar, the missing link. It even has the monthly moon phases, which I used to fill in by hand on the big one (planting by moon cycles is somehow always at the back of my mind…). The little one replaces scraps of paper and various notebooks for jotting down field work hours, market and stand sales, and the like. It’s more “business”, while the wall model holds the field stuff: planting and harvest dates, mowing, rainfall and other weather notes, a very few other basics like gas can refills, repairs and the like, plus upcoming events and various due dates. Easy! Whenever possible, I use a black pen for notes, red to highlight future stuff, and a mechanical pencil to pencil things in.
Bonus: For the small mountain of annual organic certification paperwork, the calendar format is a ready-made chronological log (They really insist on one…!).
So there you have it! A straightforward, impossible-to-lose place for everything usually keeps me on track, and this two-calendar system certainly ought to do it. ;)