Last-frost countdown begins!

Weeks-to-transplant countdown

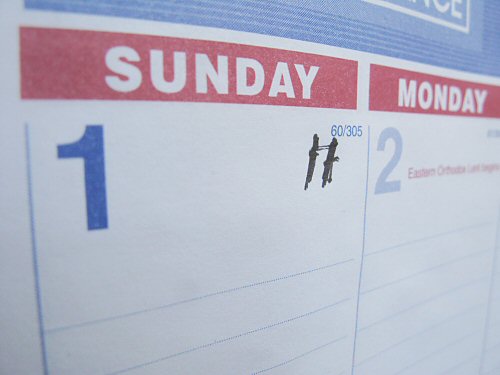
Today I marked the official farming wall calendar with the weekly weeks-to-transplant countdown:  11, 10, 9,… I do this every year, and usually a lot earlier than this! Because so much is kinda, well, UNKNOWN this growing season as far as overall production conditions on the new farm, my reaction is not to overplan and not try to anticipate every last possible potential problem. I suppose the approach varies by the person! Anyhow, having those numbers finally up there on the wall somehow really gets the adrenaline going…

What that “11” represents is 11 weeks to average last frost date, which around here is May 18 (I actually backed it up by one day, to start on a Sunday, just felt like it). This is a pretty arbitrary number, weather conditions have consistently varied SO MUCH in the last few years, last frost is ony a loose guideline. It’s something to base the gambling on.

So, it’s now 11 weeks until the odds are even that there’ll be no more frost, the soil has warmed up sufficiently, and it’s reasonably safe to transplant. From this, I can figure the timing of seed starts.

It goes like this… For tomatoes, I aim for about 6 weeks from sowing the seed in plug sheets to transplanting, so I still have FIVE WEEKS before starting toms. But, I usually want to have at least 100 tomato seedlings ready to go 2 weeks earlier than that, in case the weather’s really good, and for that I have to start in 3 weeks. Peppers I aim for 8 weeks, so that’s start in…3 weeks.

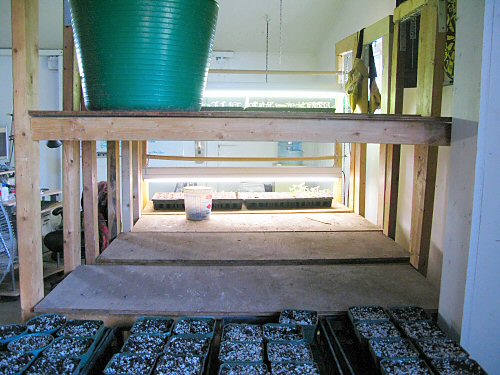
Broccoli, cauliflower and other brassicas are only around 6 weeks, BUT, they’re quite cold-hardy and can be transplanted out 3-4 weeks BEFORE last frost, sometime in the last half of April, so that means the first wave starts in a week or two! Onions and leek can also go out early, and are indoors for around 10 weeks. Some onions are already started, and the rest have to be started right about NOW.

And so on, for around 20 veggies that start as transplants…

The scratchy “11” on the calendar was originally a “7”—at first, I accidentally started numbering backwards from April instead of May. For a moment there, that was a shock! :)

Main order done!

Five hours and done! This year’s main seed order was a first: finished in one session! Usually, it takes two. My head was starting to spin a little, but I felt COMPELLED by the late date to keep going (although I don’t think I’ve ever been much earlier, I always just plan to be). Guess I’m getting…better. A small order went in a while ago, for early starters like onions. This is all the rest!

It’s a comfortably familiar routine. I cleared an end of a work table and set things out. A couple of clipboards, one with the always-handy, slightly magical  seed calculator sheet. Catalogs from the main two seed houses I use. A scale for weighing heavier seed, and seed in larger quantities. A seed scoop for checking what’s left in packets (pour out, pour back!). Tiny (3/4″/19mm) bulldog clips, great for clipping together packets. And sitting by the table, three Rubbermaid bins that hold the precious seed inventory in freezer-weight ziploc storage bags.

First, I weighed the bulkier stuff: beans, peas, larger quantites of beets, radish, and so on, stored in their own bags. Then, I settled in, going through ziplocs, more or less alphabetically, from arugula to tomatoes. See what’s left, decide what more I need. Check the catalogs, try not to go wild with extra packets of stuff, “just to try”—the amount of seed needed per veggie is already worked out on that calculator sheet. A few of the ziploc bags have only a couple of packets of seed, each a different variety, like the Brussels sprouts in the pic. Most have 10-20. Tomatoes are getting near 200. It’s a lot to go through, but it’s like hooking up again with old friends. Easy. Fun. And I’m done!

Organic certification…

While Obama gets sworn in before the eyes of the world (mine included, on a one-day return to the news), I’m contemplating the stack of paper that leads to organic certification. No connection, today just happened to feel like the day to do it…

We’ve been discussing for a while whether to certify the new farm. The old farm has been certified for six years, right from the start. Back then, I did it because it seemed like the thing to do. Right now, I’m a lot less certain of its value to the truly tiny farm.

In the end, if you’re providing organically-grown local food directly to real, live people—field-to-fork, face-to-face—why would you need a whole bureaucracy and set of regulations and a CERTIFICATE, to assure folks of what they can see for themselves by visiting the farm in person?

If only the world were that simple and straightforward.

We’re getting certified because possessing the right paper does have its advantages, it’s a way to show you are what you say you are, to people who don’t know you first-hand… It may come in handy! That’s our reason for now.

So it’s filling out time. The main application is 25 pages of questions, and there are a couple of extra forms, lists and farm layout maps to include.

Some questions are multiple choice, others are open-ended, and while there are no real “right” answers, answers either do or do not comply with the organic production rules. Compliance is what counts.

The actual production standard is pretty cool, it covers every aspect of organic growing and marketing in great detail—being able to fill out the application means you’ve gotta know some things! :)

The binder is full of previous applications and responses, inspector’s reports, the 60 pages or so of the Canadian organic standard, the US organic standard, in case we want to certify to that, too (they’re pretty much the same on the basics), and various bulletins and notices. Lots of paper.

It looks like a fair bit. In fact, once you’re certified, unless there are big changes in your farming, each year’s renewal application is mainly copying everything from last application and sending a check. After that, an inspector will show up, look around, check your records—you have to keep track of fieldwork, harvests, things like that, also, keep invoices for seed and anything else mentioned the application, like fertilizer and cleaning products—ask some questions, and a couple hours later, it’s done.

Anyhow, here’s to getting the paperwork done and in the mail!

(PS: I do like the grassroots, no-cost, farmer-to-farmer Certified Naturally Grown program, which we started also certifying with last season and intend to continue with! I donated $100 to CNG for 2008, and also bought some signage and stickers. Organic certification costs about $400-500 a year for a tiny farm in Canada.)

Work for a dreary day

Rain is usually the only thing that stops work in the field, and not even that on harvest days, but this crazy cold May has had it’s particularly nasty, stay-inside days, and today was one of ’em. With a sharp, damp wind, and temperature around 50°F (10°C), stepping outside instantly set you to shivering. It wasn’t THAT bad, of course, and I think it was so off-putting mainly because of the sudden shocks of drastic day-to-day changes we’ve been having lately. In any case, there was no super-urgent fieldwork, that couldn’t wait a day, so we decided to hide out and do…indoor stuff. Bad weather days have their place on the tiny farm, you can catch up on all sorts of things that might get put off otherwise, and later get in the way or interrupt your…flow. Today, we repainted garden marker stakes (these guys are kinda expensive, you don’t wanna waste ’em) with a thinned out latex exterior paint. I’d only done this once before, by dipping (it took 4-5 years to accumulate enough that a good number were so written on and faded, they needed a little makeover!). This time, I figured a brush would be quicker, which it was (except, don’t use a newspaper liner, the paint makes it soggy and then it sticks; for the other side, we just painted on the table directly, and wiped up afterwards).

Other pleasantly sheltered jobs included removing the lights and chains to turn the grow racks into harvest bin storage (left a couple of lights on for a last few seedlings) and packing up the lightbox set-up to free up space, reorganizing part of the drive shed with all the farmers’ market gear, doing some work on the enclosure for the composting toilet, seed starting for another wave of broccoli and cauliflower transplants, making some calls,… Most of these weren’t on the whiteboard task list of the most important things for the next few days. For the to-do list, I used to use the notebook I carry in my back pocket everywhere, but since last season, with Conall full-time, I switched to the big board (it joined the smaller harvest board), to make it easier to SHARE the fun with everyone…!

It’s mostly immediate stuff. The list on the top right is bigger projects and purchases to keep in mind. The “Must do first always!” is a distillation of things to do every day, kinda like a day-to-day framework for tiny farming fieldwork, meant for anyone helping in the field on a regular basis—it’s a work in progress! :)

Tiny Farm Bookshelf, Part 1

Books on farming

This is about a quarter of my farming bookshelf. I get a ton of info from the Web, particularly in winter when I have more time to cruise around online, but books I’m still most fond of. Let’s see what we have…

For one-stop shopping, you could take Rodale’s Garden Problem Solver and a bunch of seeds and that’s all you’d need to get started. This book wasn’t an early acquisition, I think I got somewhere into my first year, but it’s turned out able to answer just about every organic production question I’ve had, from cultivation to irrigation. It’s a little sun-bleached from trips to the field. And then, The New Organic Grower is probably required reading if you’re selling what you grow: practical and also kinda inspiring on the microfarm marketing side.