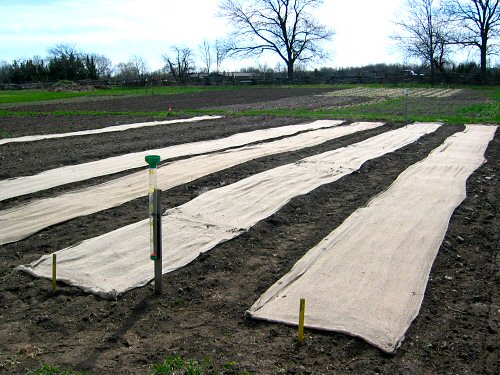
Welcome to my carrot lab! Carrots have been my biggest early spring headache. In cool weather, they take forever to germinate, 2 or 3 weeks, and by that time, the chance of weed competition is pretty good, and just about anything growing around the tiny seedlings makes excruciatingly time-consuming surgical hand weeding a necessity. What to do? Last year, I tried IRT (plastic) mulch over the bed. This worked great, heating up the soil, speeding germination to 7 days, and keeping weeds down. Problem was, miss the germination window (when a good number have emerged) by a few hours or a day, and the seedlings got toasted in the heat. Too delicate a balance. So, a new approach, something I’d read about. It involves a double layer of (untreated!) burlap. Simple. The burlap acts as a mulch to retain moisture and increase soil temperature, and it also allows in water and some light. What could be easier?!?! Now, all it has to do is WORK! (Update: it worked like a charm…)
Tools
Equipment for large-scale agriculture is too big or too expensive, and many home gardening tools don’t work efficiently on larger jobs or break easily. Tiny farming on plots up to two or three acres requires its own special gear…
Off to the hoophouse
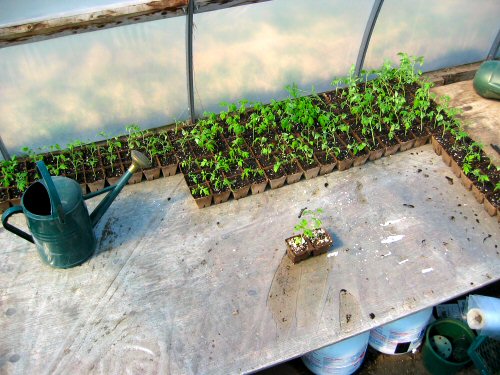
The first set of tomatoes is now in the unheated (but heatable!) hoophouse. They’re freshly installed in 3″ Jiffy pots (peat pots that can be planted), watered in, and awaiting the first night’s cold. It’s supposed to go down to 3°C (37°F), which isn’t bad, but it’s always chillier in the field than in the forecast. Peeking out from under the table, two fat little propane tanks: round about midnight, I’ll be on temperature patrol, ready to fire up the propane construction heater if it looks like a freeze. Working the night shift. Farming after dark!
The spreader
Last of the big machine work! Bob using the spreader to drop off a pile of compost for distribution by shovel (shot two days ago). There is something really satisfying in this crazy world about technology that is straightforward, like a giant fan-blade device for tossing manure far and wide! Today, I finished rototilling the new section, ending the main tractor work. From here, most of the fieldwork is done by hand—the biggest machine is the little Kubota. Later on in the day, it rained, only 5mm but enough to save hours of watering-in newly seeded beds. Time to start keeping track of the rain…
Greens machine!
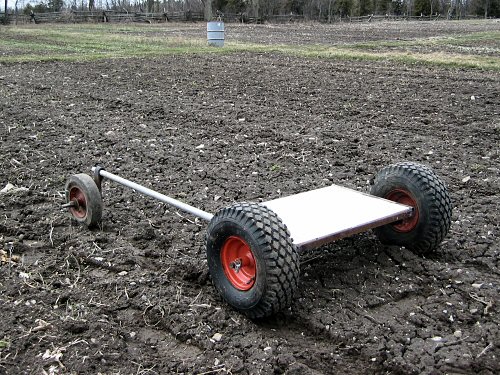
Surprise! I feel like a kid with a new go-kart. I plan to learn how to weld this year, and I’d been discussing with Bob this specialized harvest cart as a first project. Well, he went ahead and whipped up his own interpretation, using parts that were hanging about. Voila! The cart sits over a bed of mesclun, spinach or other low greens, wheels in the paths, you lean forward to cut, and move it a foot or two at a time with your feet. The minute I sat on it, the improvement from crouching or straddling the bed and bending over was clear. Cutting in comfort, and it’s supposed to near double your speed. It moves easily even in pretty wet soil, and the height seems right, but it’s still a prototype, to be harvest-tested and refined. Over the season, I cut TONS of greens (maybe not literally, but feels like it), so I’m excited!
Breaking new ground
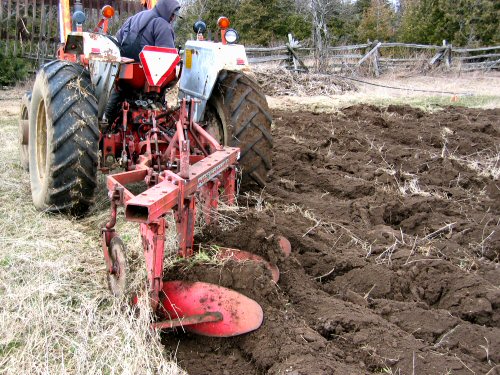
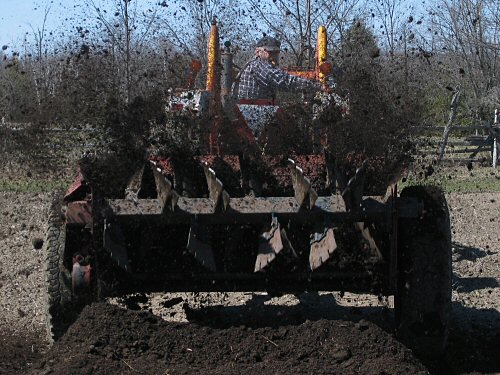
Added a new section to the garden plot today, with a helping hand from Bob, his tractor and a moldboard plow. The moldboard turns the top few inches almost completely over. It’s very effective for breaking up sod, and it’s also sort of an old school approach. Apparently, some farms moldboard once or twice a season, but as a regular practice, it’s not great for the soil and has somewhat fallen from favor in recent years. Here, it’s a one-time plowing that gets the job done!
Horse back in action…

The Troy-Bilt Horse walking rototiller is back in action for the first day of tilling in the field. I prepped a 50’x50′ section for snap peas. The Horse is noisy and uses a fair (though not unreasonable) share of gas, but it’s also a very handy machine for larger areas (in fact, I would’ve used the rototiller on the tractor, but the ground is still too wet to take the weight). All things in moderation on the way to becoming a fully-rounded, taking-it-slow, hand-laboring farmer! (Gear note: This Horse is c. 1995, from the original Troy-Bilt line, before the company was gobbled up by a bigger one and the construction got more lightweight. I bought it used, at half the price of new, and in near mint condition. It should last a long, long time—in my first farming year, I borrowed a rusty 30-year-old Horse that did just fine.)
Plug sheet action
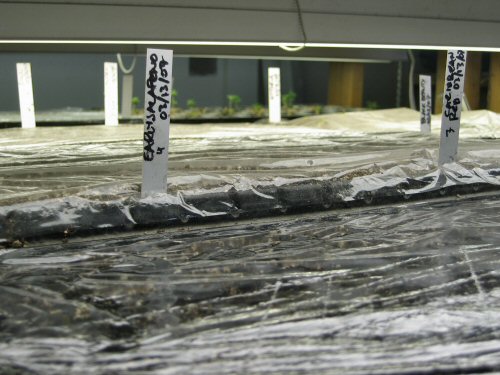
Plastic cling wrap is everywhere. I tried it out last year as a replacement for clear tray covers and it seems to work fine. The method so far: fill the plug sheets with seedling mix, place tray in water so mix is soaked from the bottom up, drop in 2-3 seeds per cell, cover lightly with more mix, soak surface with spray, apply plastic wrap (it sticks nicely to the wet edges of the plug sheet), fill out label marker with variety/date and plunge through plastic (those labels are all that stand between you and variety chaos!), then it’s off to the racks. Now, the trays don’t have to be watered for a week, the mix retains more heat, and you can check moisture by looking at the condensation on the plastic. At first, I wondered about adequate air circulation and whether the fairly closed conditions would encourage algae, but the seedlings emerge on time with no unusual algae problems. As soon as the first couple of seedlings appear, it’s off with the plastic. I re-use the plastic as well, over the 4-5 weeks of seed starting, and the bit of waste in the end, well, I think it’s moderation in everything that counts. (In the top right of the pic, the Vittoria eggplant is tenting its cover, having pushed up vigorously in just six or seven hours overnight. It’s a feisty one!)