Skinning the hoophouse

This is the spring of Finally… Today, we finally got the plastic on the hoophouse, can’t believe it’s been over a month since the frame went up! Anyhow, it’s done! A kinda huge turnout of people: Libby, Jordan, Andie, Tom, and Lynn (planting grain elsewhere during the hoophouse skinning). A bit of a breeze, but it didn’t get in the way. First, the ends went on, and then, the big job, which with a lot of hands is pretty simple. Started by pulling the plastic over* and loosely fastening it at one end (the many hands really help)…

Next, we slid it along. I’m on the ladder, putting UV-resistant greenhouse tape over the edges of the ribs where they join the ridge, so they don’t rub on the plastic (clearly, that’s a one-person job…could’ve been done ahead)…

Get to the other end, and fasten it! There’s still a fair bit of wood work to secure it all, and electricity and then the squirrel cage fan to install, to inflate the double layer of plastic, but the main job is basically DONE. One more thing on the new-tiny-farm start-up-from-nearly-scratch list, practically checked off! (I should move the jumbo rain gauge to a completely unsheltered spot…)

*It’s a lot easier to lay the plastic out lengthwise beside the frame, then pull it over from both ends in one shot. We did it this way because there was only one tall stepladder, and to avoid catching the breeze on the full length of the plastic as it went up—a completely calm day is best, but with a lot of people, you can handle a little wind. (Photos 1 and 2 by Andie)
Water pipe

Irrigation pipe

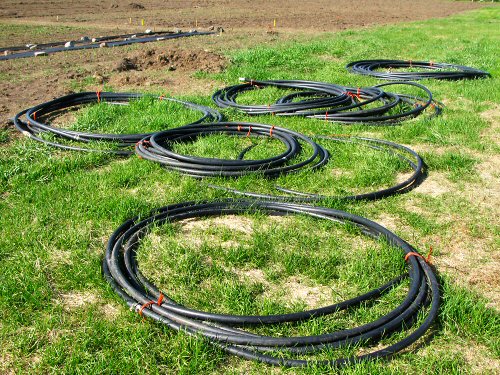
A bonus this spring has been the steady rain, not too frequent, like, once a week or so, and somewhere around 1″ (2.5cm) each time. Perfect! Still, today, in the middle of a hot, sunny stretch, thoughts turned to water (not that it was ever far from mind). Out came the coils of 1″ water pipe. In our barebones spot irrigation system, there’s 1″ pipe and a bit of 2-1/2″ pipe, endless 5/8″ garden hose and 50′ sections of soaker hose, the gas-powered irrigation pump, and even 55-gallon barrels and watering cans. Not to mention, piles shut-off valves, quick connectors, and various hose fittings. For now, all that I’m looking to set up is one central line running from the well pump at the house, right down the length of the side-by-side fields, where it can feed the garden hoses. So, uncoiling we go…

Spot the tiny farm!

Rototilling on the Kubota

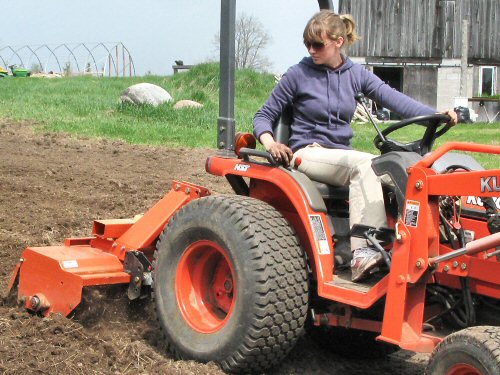
What’s in a photo? Depends what you’re looking for! Take this pic of Andie, rototilling today with the Kubota. Pretty straightforward: woman, machine, field. BUT, can you spot practically  EVERY main part of a really tiny farm (at least, of this one), represented right here?

It’s mostly hand work, but there’s some gear: Of course, we have the Kubota compact tractor, flagship of an motley assortment of gear specifically suited to tiny farming. It’s rugged, very much a diesel TRACTOR, but small, and designed more for the big estate crowd than agriculture. Around here, though, it’s the workhorse machine, a people multiplier with its bucket and essential 48″ rototiller. As far as I know, rototillers aren’t core gear on tractor farms, but it’s our ONLY field implement so far, a huge labor-saver over walking up and down with the walking rototiller, or digging by hand. And the turf tires seem to work just fine.

New people diving in: And then there’s Andie, doing (tiny) tractor work within the first few hours of her entire market garden experience. (It’s cool that she’s already looking over her right shoulder, it’s a classic tractor farming pose—except maybe not with GPS?) She also has DIRTY HANDS on the wheel, from checking out the tilling results, and they’ll stay dirty as she moves off the tractor in a few minutes, on to hands and knees to plant onions.

A big shed (aka barn): A barn of some sort is the main, sooner-or-later essential, working structure that separates clear land from a working tiny farm. Really, a basic barn is just a big, all-purpose shed  (this one, 20’x32′, is pretty tiny, just four walls), for getting things out of the weather. You use it to store harvests and gear, and to work out of the wind and rain  (and of course, we have winter). With rough carpentry, you remodel and reconfigure it to fit: an extra hook here, new door there, closed off room in a corner, whatever you need!

Lots of work, all day long: Elsewhere in the pic, less obvious but clear signs of tiny, labor-intensive veggie growing.  In front of the barn, tables of seedlings are hardening off. They’re brought out in the morning, taken in at night, back and forth, back and forth. That’s because the greenhouse (hoophouse frame on the left) isn’t finished yet. And THAT’s because there is just SO MUCH TO DO ALL AT ONCE. Like, mow the grass for mulch, before it gets outta control. And get a new battery for the John Deere riding mower (on the top left), so it can haul around the trailer loaded with whatever we need to get LOTS MORE STUFF done. It all weaves into one big picture of tiny, simple, interdependent tasks that go on and on and on, all day long…

It can get a little intense, but it’s also really fun, if you don’t get all grim and serious about it and try to tie in the state of the entire planet (try to stop following the news!). You get to pretty much see where you’re going. Meet people in a really interesting way. Eat well. Sleep well. Kinda…simple! I think that’s a pretty good start…

Hoophouse end walls

With the clamoring demand for greenhouse space around here, getting the hoophouse finished now that the frame is up is a PRIORITY. Yet here we are, a week later, framing the end walls and installing the wood along the sides for the roll-up section of the sidewalls. A stretch of wet, cold weather was the main cause for delay. Plus a really long list of other critical things to do at the same time.

For maximum satisfaction on the tiny farm, you want things to effortlessly flow along, from one small task or specific problem, to the next (IMHO, of course!). Right now, there are lots of phone calls to be made, things to follow up on, info to find, bits to write and forms to fill, stuff to source and buy, all sorts of more abstract, open-ended, DISTRACTING activity. Eventually, it will settle down into a more-or-less all-garden flow…

In the pic, Jordan and Lynn work on reassembling the end walls. The ground isn’t absolutely level, there’s a gap to fill underneath the 2×4’s along the bottom (the sill plate). This isn’t a problem as the weight of the hoophouse sits on the 4×4’s running along the sides—they’re firmly anchored, so we’re set.

In this case, we can’t cut the studs longer to extend the wall, because we’re going to reattach the existing, pre-cut plastic. Everything has to come together the way it was. I should’ve numbered and marked each rib and piece of wood as it came apart. I’d usually have thought of that, but in this case, I only marked the main plastic, so that we could reverse it. Now, fitting it back together is a little puzzle… After this, there’s not much more to do, just wait for a windless day to skin with plastic. Onwards!

People at work: hoophouse goes up!

Another beautiful and busy day in the field, with Lynn, Mel, Jordan, Tara and, for her first full day, Andie, all variously raking, tilling and building. And eating lunch (can’t wait for proper farm food to kick in!). The most VISIBLE accomplishment today: we put up the frame of the hoophouse, which is the main part of the job. This was mostly done by Andrea and Jordan, first-time building for both of them, with me holding hoops, furnishing tools, and starting them out with some how-to advice. Working with light, pre-formed metal is particularly satisfying, things can go up fairly quickly, to produce dramatic results (or maybe it’s just me, waiting for that greenhouse!!!). It seemed like the satisfaction at the end was pretty deep! :)

Screwing the hoops to the ridge is the main structural task. We used the bucket on the Kubota compact tractor as a raisable platform…

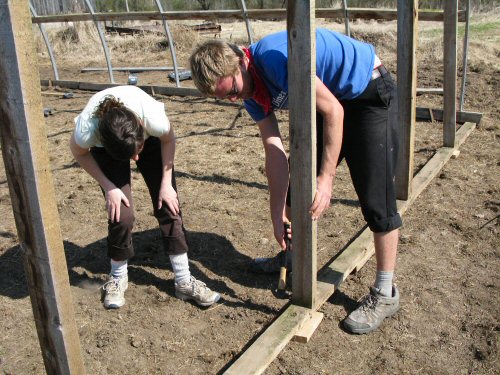
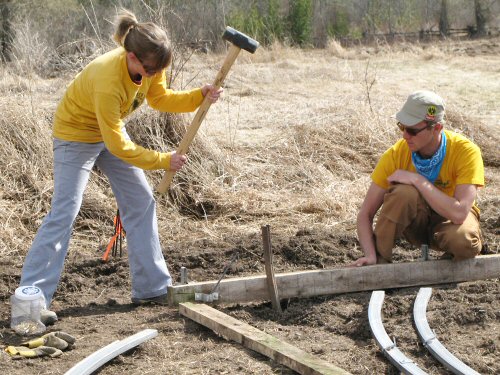
Since this is a re-assembly job, all the parts and pieces were there to be…assembled. First, lay out the 4×4 base, and pound in eight 3′ (0.9m) iron T-bar stakes to anchor the hoophouse. The T-bar is attached to the wood with lag bolts. Pounding was relatively easy, the ground is still soft, but a little bit of a workout. And if you look closely, near Andie’s foot and Jordan’s knee, you can see the brackets that the hollow steel hoops fit over, at 4′ (1.2m) spacing…

Next up, starting the frame. Attaching the first two pairs of hoops to the ridge is the trickiest part. The hoops slip over stubs in the ridge, then they’re screwed in place. A cordless drill and a couple of wrenches were all the tools we used. It’s wobbly at first, the more hoops you add, more stable it gets!

And there we are! Andie tightens up nuts on the cross-braces (purlins). In front, the lumber for an end wall is layed out. Halfway there. All in a tiny farm day’s work…

Compressed air and rototiller repair

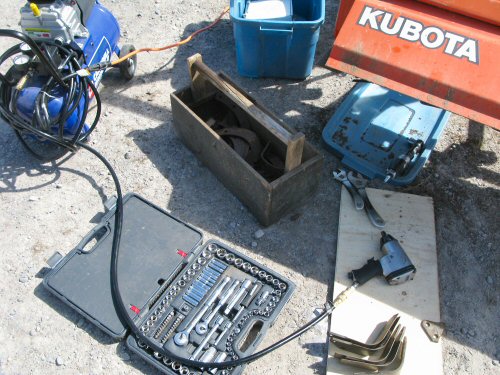
Looks like a whole lotta gear for swapping out one broken rototiller tine. Two bolts. BUT, this was a chance to try out the air tools with the new, tiny (8 gallon) compressor. So far, all it’s done is inflate tires.

The compressor is a smaller-scale replacement for the heavy duty one at the old farm. It’s not an absolutely essential bit of gear, but it does a lot of farm work: inflating, cleaning out things like screens and filters with blasts of compressed air, loosening big nuts and bolts (impact wrench), and removing lots of nuts quickly (air ratchet). And it can do more. I use it at least once or twice a week.

This unit is the top end of the home handyman line. The smaller tank means it can’t put out full pressure continuously for too long.

Sometimes, getting “home” gear for the tiny farm just doesn’t make sense, the equipment isn’t up to what you need it for, or, it breaks. But you often don’t need or can’t afford the same heavier equipment as, say, a more tractor-driven farm. Then, the choice is to rent/hire, or buy lighter duty IF it will really work.

Buying used equipment is another great approach, but, you need lead time—you want a tool there when you need it, not only after a good deal comes along—and you need extra buying skills to make sure you’re getting good used gear…

In this case, compressed air is used quite frequently, I couldn’t justify the cost of a commercial/industrial compressor, and I wanted it right away (here, the difference was two or three hundred dollars, and that adds up). Of course, I figured this one would work out, but you don’t know for sure until you try!

The impact wrench did just fine for de-bolting and re-bolting (I finished tightening up by hand). Now I know this little compressor can handle all the usual tasks on a tiny farm scale. Another CHECK on the new-farm, getting-set-up list. That’s good!

Making space and saving space

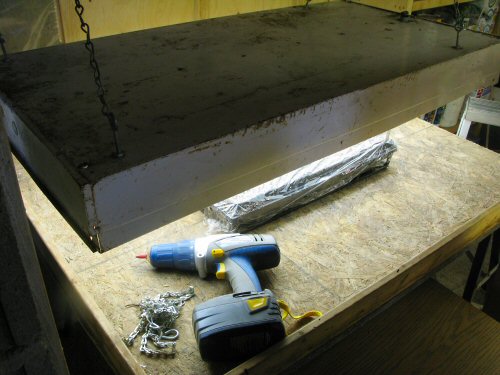
Hanging the lightbox is again this year part of the spring time set-up in the seedling room, when gear comes out of storage for seasonal use. In late winter, the fluorescent lights are put on the light racks, and removed after seedling production is over, usually in June, so the racks can be used as overnight harvest storage. And the lightbox, with its 4 fluorescent tubes, adds extra plant space when it’s need. I put it up today…

At the old farm, in the Extended Milkhouse, there was no space to waste, and it’s the same here in the new seedling room. That means clearing and converting the layout to fit the needs of the moment.

Tight quarters has a lot to do with the weather. Building a space insulated against our fairly brutal Canadian winters, and then keeping it warm enough for seedlings, is relatively expensive, and construction tends to be limited to the minimum you need.

In summer, the same insulation keeps the seedling room cool. It’s good to have a chill-out spot near the field, with phone and Internet (all the modern telecoms conveniences!), tea and cold drinks, chairs and a table…The more room the better. So, the lightbox goes up, and soon it comes down…