
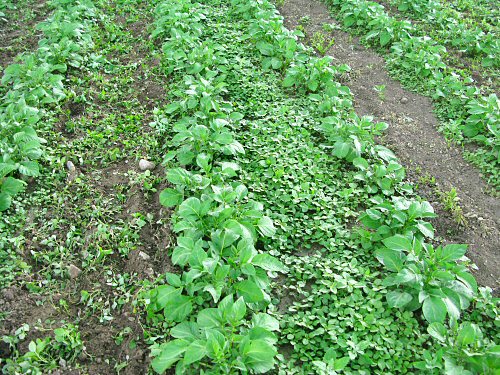
The Friday harvest is still greens-heavy, with beet greens in several varieties leading the way. Here, as the afternoon winds down and the temperature cools, Michelle and Lynn thin the second beets planting of Scarlet Supreme, with Chioggia and Bull’s Blood off to the right. There’s also the fourth planting of all-lettuce mesclun, just cut on the far left, and in the center, Panther romaine, miraculously spared by the earwigs and in excellent shape and taste, to be cut next… Elsewhere, cauliflower, parsley, the last of the spring spinach and peas,…
thinning
Tiny harvest!
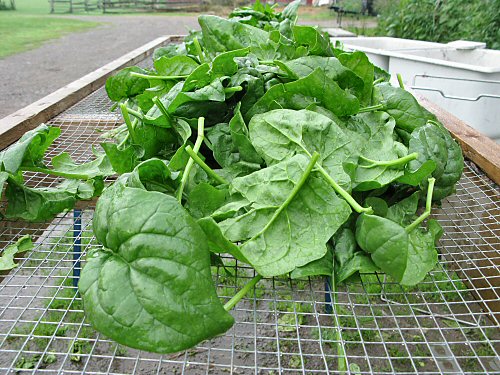
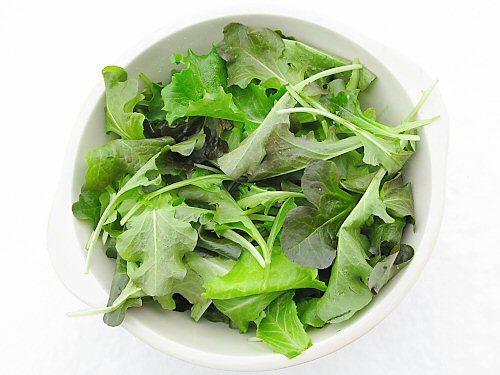
Spent the early morning harvesting a few CSA shares for a Monday drop-off. This is the first week of shares, and they’re still small, mainly greens… There are many tiny farming routines, things you’d probably never do in a bigger operation, that I find extremely relaxing and fun: the final rinsing and putting together of a handful of shares is one of them (it’s not really economical to separately harvest and drop off less than 10 shares or so, this is an…exception). There’s something deeply satisfying about this final post-harvest step, with the veggies together at their finest, the memory of the different quick individual harvests—picking, cutting, pulling—still fresh, that’s…cool! The spinach (above) was quickly dunked in cold well water to rinse off dirt splashed up from recent rain, then allowed to drip dry for a bit on the screen table.
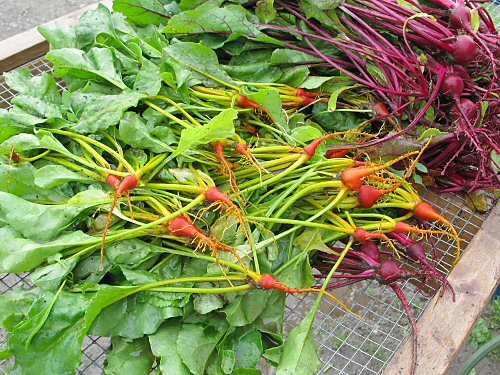
Picked two types of beet greens, Golden Detroit and Scarlet Supreme. The stems are a little long on these—it all depends on the density of the rows, the weather, the harvest timing, leaf size is the luck of the draw since these are really thinnings, they’re not being grown just for the greens. Still young and tender, the baby beets and all can be cooked up, or the leaves used raw in salad (or as a salad!). Really tasty…
And mesclun, of course. This all-lettuce salad mix is a staple crop this year as usual, always on my mind! This cut’s nice and clean! Unrinsed—I let the morning dew dry off a bit on the screen table… More simple pleasures for the simple of mind! ;)
Thinning and weeding
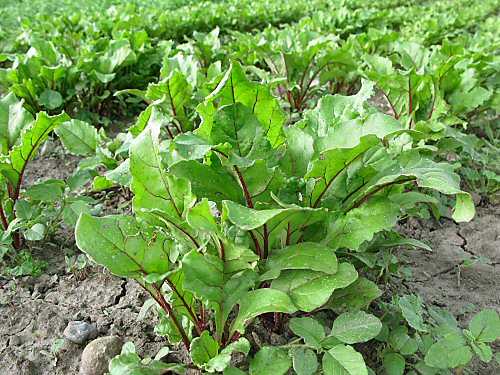
The first beet greens have sized up: lush and looking delicious, they’re ready to harvest. I love beet greens, both raw in salad, and lightly sauteed in olive oil and/or butter (a kind of deluxe spinach). I’ve never grown them as a separate crop, instead, they’re a happy byproduct of thinning the beets—removing the extra plants so that the remaining beets have room to grow. So the greens are both a harvest crop…and a weed. (I guess this is a continuation of yesterday’s post about WEEDS!) As you can see below, with the exception of a few gaps where nothing germinated, the first-planted beets are growing quite solid in their rows, which means a lot of plants have to be removed, maybe as much as 6-8 out for every one left behind (did you know, beet “seed” is actually tiny dried beet fruit containing several seeds?). There’ll be so much from four or five 3-row beds of beets, I won’t be able sell, eat, store or give away all of the greens that’ll pile up, but I can’t leave them in to stunt each other, so at at some point, the thinning becomes…weeding. Funny how that works! :)
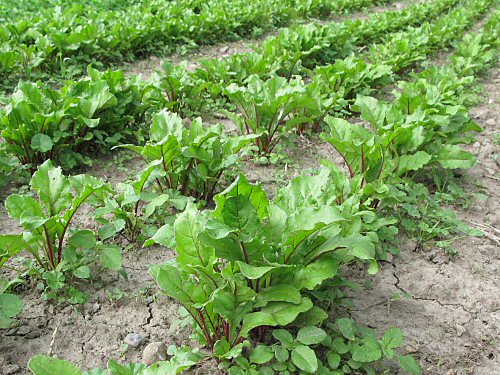
Meanwhile, after a quite intensive weeding by hand and hoe a few days ago, the beet beds and paths are in fine shape, with only some growth near the plants that’ll come out during the thinning. (The cracks in the ground are what happens with our heavyish clay-loam soil: it’s not at all concrete-solid, it’s nicely moist, but as the surface dries out, it tends to…crack.) As far as overall weeding, with some quick touch-up hoeing along the way, these beds should be fine till harvest in 3-4 weeks (maybe earlier for some). The increasing leaf cover will keep down weeds near the plants, and the increasingly narrow paths and between-row strips can be quickly walked down with the weed hoe. It should be…sweet! On the other hand, in the potato patch…
…things have gotten a little crazier. A dense and vigorous mix of mostly pigweed and some lamb’s quarters has carpeted one of the two potato sections. Here, you can see the difference a pass with the wheel hoe makes. On the left, a just-hoed path still looks pretty green. In the middle, it’s untouched and looking a little scary. I’d call this…Stage 2: leave these little guys just a few days longer, and it’ll be a fight to hoe as the pigweed stems in particular will start to get tougher. On the right, a path weed-hoed a couple of days ago (I was on the way through while walking back from hoeing another area)—after a day of sunshine, the cut and uprooted weeds dry up, and you can see how much weeding you’ve really done. There’s still a lot of close work around the plants, but the potatoes are really shooting up now, so once that final weeding is done, the plants will shade out and prevent germination of whatever weed seed’s still near the surface. On the other potato section, the weeds aren’t nearly so…dense. On this one, some of last year’s weeds obviously went to seed, which really increases this year’s population. It almost fee;s like a closed system: what work you get away with not doing now, you eventually pay for later, usually with a little interest…
Seasonal salad
The first harvested dish of the year here usually comes from early lettuce, but not usually from lettuce still in plug sheets. With my ambitious early salad greens timing, and the way colder than hoped for weather, transplanting to the greenhouse was delayed by a couple of weeks, and the lettuce seedlings stayed in trays and went crazy. Today, I started thinning them heavily for the move, and ended up with a healthy portion of baby leaf salad! This is a mix of Simpson Elite, Granada, and Two Stars. The colors are still indoors pale, the taste and texture delicate. With a simple olive oil and lemon juice, salt and pepper dressing…delicious! And still a couple more bowls to go…
Seed starting tools II
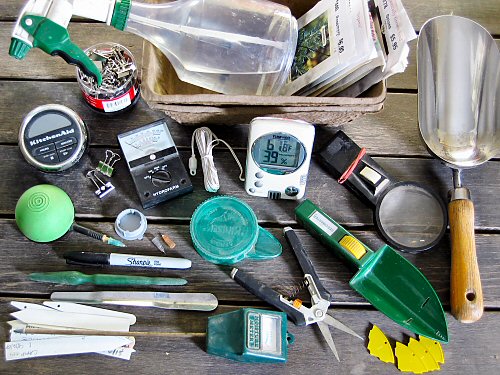
Here are ALL the indoor seed starting tools I have, most of them always-used, a couple not. Nothing special, and FINGERS I’ve found are handiest for most of the work at this scale. In any case, a few details (and there’s more on #1-5 in Seed starting tools, part 1): 1. The Seedmaster, a gadget for trickling out small seed as you rotate the wheel (the yellow pieces are click-in filters for different seed sizes); 2. assorted white plastic plant labels; 3. a dibbler or dibber or whatever, for poking little holes in soil; 4. a fine-point black waterproof marker (I like Sharpies) for labeling; 5. the mini-transplanter is essentially a tiny, stainless steel shoehorn for easy liberation of plugs from their cells; 6. a moisture meter, simply stick it in the soil; 7. plant snips for thinning seedlings; 8. Mini-Sim seeder: fill and shake out; 9. suction seeder with three tip sizes: squeeze the bulb, put the tip on a seed, release to hold, squeeze again to drop… ($25…what was I thinking?!); 10. digital timer for keeping track of repetitive tasks like bottom-watering trays one by one; 11. plant light meter, reads in footcandles, with settings for indoor and out; 12. digital indoor/outdoor min/max thermometer/hygrometer, mainly for keeping track of temperature; 13. magnifying glass with light, for examining seedlings (and GREEN MOSS) up close; 14. soil scoop for filling plug sheets and pots with seedling mix; 15. spray bottle with good quality spray head (more water per pull; I’ve used a wand mister like I have in the greenhouse, but the hose kept getting in the way, I may try one again for the seedling room this year); 16. small fibrepak flats, convenient for holding tools and seed packets on the potting table (left lying, the packets can so easily get wet…); 17. small bulldog clips, useful for all kinds of things, like organizing groups of seed packets. And the winners are…all of them, EXCEPT for: #9, which I found to be useless for my purposes; #8 which is great, but mostly for heavier hand seeding in the field, like for flowers; and #6, 11 & 13, which are more educational toys than essential tools, but still cool! (Wow, that was a lot of blogwork for pretty obvious stuff, but there you go! :)
Simpson Elite
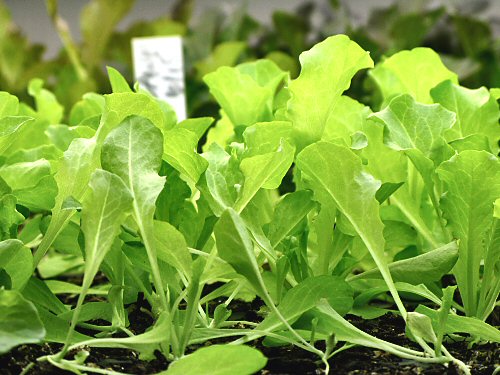
More early lettuce. This is Simpson Elite, an improved variety of Black Seeded Simpson, which is a really fast, reliable heirloom from the 1800’s. I grow both. They have thin, delicate, pale green leaves, but they’ve proven tough in heat, drought and cold. And they’re 40-45 days! These seedlings are now about 3-1/2 weeks old. I still haven’t thinned them from two per cell—all the lettuce looks so…pretty, densely bunch in their trays, and they’re stretching a bit, but just this side of really crowding each other. Anyhow, it’s the super-early lettuce…mostly for fun! (This is also my first tryout of the latest new farm tool, a Canon G9…a sturdy, field-ready bit of gear… :)
First cuts

Time to thin out the lettuce and arugula. Between the seven varieties, some of the seed I used was up to four years old, so to be safe, I was quite generous, maybe 4-5 seeds per cell for the arugula, and a bit more for the lettuce (that tiny seed can get away from you, though with new seed, I try to go lighter). Germination was good, and the little seedlings are already shading out each other as they push for the light. I’m still getting used to timely, to-the-point thinning, both in the trays and in the field. I usually have the urge to leave ’em a while longer, but almost always, this ends up being not the best thing to’ve done. Give the best ones the biggest break as early on as possible, which means, kill off the rest. This also takes some timing experience, but in general, it’s hard to go wrong by not waiting around. Sounds brutal, but that’s about it! The lettuce will eventually be one per cell, although for now I’ll leave a couple per. Starting arugula indoors is a first for me, I usually direct-seed, so I’m figuring things out this time around. I’ll leave two per cell, and plant them out two together at 6″ (15cm) spacing and see how that works out. Here, I’m snipping arugula at the soil level with wickedly pointy little shears…