
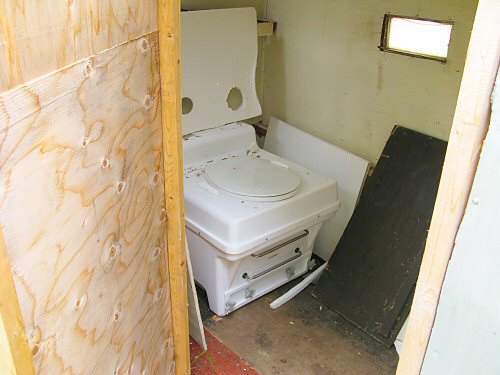
The outhouse updated! This Envirolet composting toilet, the deluxe AC electric model, is possibly the most unusual farm purchase I’ve made so far, mostly because it was quite expensive and I’m not 100% sure why I got it. With a hefty $500 off on special, it was still somewhere around $1,200, which on the tiny farm budget counts as a major purchase (the used John Deere riding mower cost the same, and it does fieldwork!). And considering that you can build a composting toilet for little or no money, from scrap wood… Call it divine inspiration, like: “You must get this toilet”? Anyhow, it’s here, it’s been here since around Feb. 2007 (the special offer was expiring), it hasn’t gone unthought-of or unmentioned,…and it’s finally, slowly, getting installed for this season! The general idea is to have facilities in the field, which is a lot more convenient than heading into the house. Still… These toilets do sound quite amazing: odorless, comfortable, able to compost six months of humanure into a thin layer in a slide-out tray. Models range from no power, to AC/DC (has a fan), to regular AC plug-in (fan plus heater for the coldest days). The more power, the higher capacity, as the fan or fan/heat speed up evaporation: this one is rated for 8 people x 3 “uses” per day. I guess I had visions of LOTS of toilet traffic from the field. And this attractive little waste-handler is quite an inviting intro to personal waste recycling, compared to a hole cut in a board (and you can use these in homes to replace regular flush toilets as well!)… For installation, the original plan was to build an enclosure, but this discarded ice fishing hut came up as a ready-built alternative. Converting it is only a few hours work, but it’s being done in little bits and pieces. First, the rotting door was removed and the frame widened to let the toilet in, the various built-in ice fishing conveniences—bench, shelves—were removed, and some rotting floor replaced. Next step, fitting the toilet’s ventilation pipe through the ceiling. And then, interior decoration! A coat of whitewash for a start… Coming soon!
Building & Fixing
Work for a dreary day
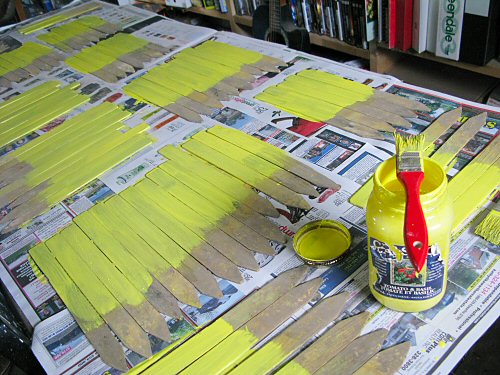
Rain is usually the only thing that stops work in the field, and not even that on harvest days, but this crazy cold May has had it’s particularly nasty, stay-inside days, and today was one of ’em. With a sharp, damp wind, and temperature around 50°F (10°C), stepping outside instantly set you to shivering. It wasn’t THAT bad, of course, and I think it was so off-putting mainly because of the sudden shocks of drastic day-to-day changes we’ve been having lately. In any case, there was no super-urgent fieldwork, that couldn’t wait a day, so we decided to hide out and do…indoor stuff. Bad weather days have their place on the tiny farm, you can catch up on all sorts of things that might get put off otherwise, and later get in the way or interrupt your…flow. Today, we repainted garden marker stakes (these guys are kinda expensive, you don’t wanna waste ’em) with a thinned out latex exterior paint. I’d only done this once before, by dipping (it took 4-5 years to accumulate enough that a good number were so written on and faded, they needed a little makeover!). This time, I figured a brush would be quicker, which it was (except, don’t use a newspaper liner, the paint makes it soggy and then it sticks; for the other side, we just painted on the table directly, and wiped up afterwards).
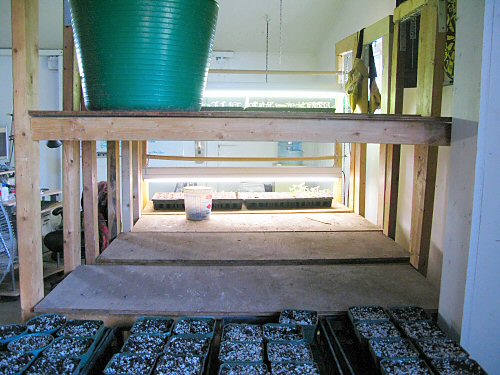
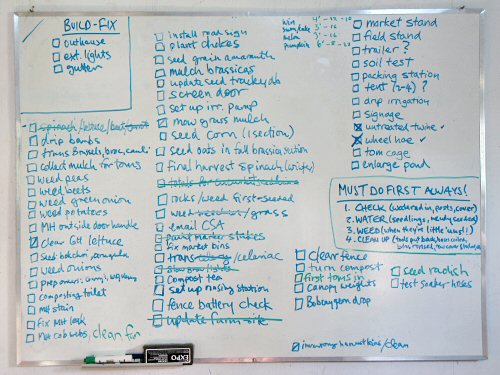
Other pleasantly sheltered jobs included removing the lights and chains to turn the grow racks into harvest bin storage (left a couple of lights on for a last few seedlings) and packing up the lightbox set-up to free up space, reorganizing part of the drive shed with all the farmers’ market gear, doing some work on the enclosure for the composting toilet, seed starting for another wave of broccoli and cauliflower transplants, making some calls,… Most of these weren’t on the whiteboard task list of the most important things for the next few days. For the to-do list, I used to use the notebook I carry in my back pocket everywhere, but since last season, with Conall full-time, I switched to the big board (it joined the smaller harvest board), to make it easier to SHARE the fun with everyone…!
It’s mostly immediate stuff. The list on the top right is bigger projects and purchases to keep in mind. The “Must do first always!” is a distillation of things to do every day, kinda like a day-to-day framework for tiny farming fieldwork, meant for anyone helping in the field on a regular basis—it’s a work in progress! :)
Greenhouse upgrades
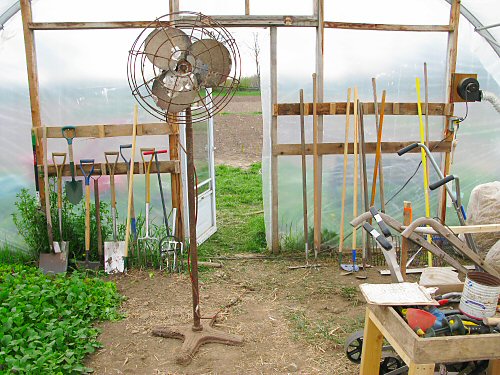
Another cloudy, cool, kinda chilly day. There’s always fieldwork to do, but this type of weather is also good for building, fixing, organizing…indoors. Today, some long-planned greenhouse upgrades. They may not look like much, but it’s a pretty big bunch of improvements! As part of Shannon’s kinda intensive “this is what I do around here,” hands-on experience (with full narration!) on this tiny farm, I showed her how to use a couple of basic power tools—cordless drill, chop saw—and she built simple legs for a wooden tray that I use for various small, often-used bits of gear (the tray’s shallowness is an automatic organizer: things can’t get really buried!). Really simple, rough carpentry, but if you haven’t used tools much or at all, and then you build something that’s immediately used in the course of the farming day…it all makes more sense! At the other end of the hoophouse, I put up another wooden crosspiece for leaning long-handled tools, and we separated the most-used and put the least used at the other end. Again, by avoiding a pile of stuff, everything’s easy to grab and put away. And then, we pounded a couple of 2×2 wooden stakes into the ground (pounding with a mini-sledgehammer was also on the farm experience menu today, I pound a lot of stakes for tomatoes every year as well…), and screwed another 2×2 as a crosspiece to make a leaning rack for the seeders and the wheel hoe (you can see one end on the right of the pic, one of the posts has orange tape on top). Finally, a machinery addition, a big, old, rusty, dangerous-looking high-volume fan on a really heavy iron stand. I’ve been meaning to work on greenhouse ventilation for ages…but always ended up using much smaller home-type fans. This one, which was actually being stored in the chickenhouse, I hadn’t noticed till now. It moves a ton of air, and reduces the temperature a full 10-15°F in the middle of a hot day. Cool! To look at, these little building projects are absolutely basic and kinda primitive, but they’re quick, easy, solid cheap, and really make a huge difference when you actually use them… (I just noticed in the pic how the right side of the end wall seems to be sagging, it doesn’t look that way at glance, I should check it out and see what’s up…)
Big rototiller breakdown
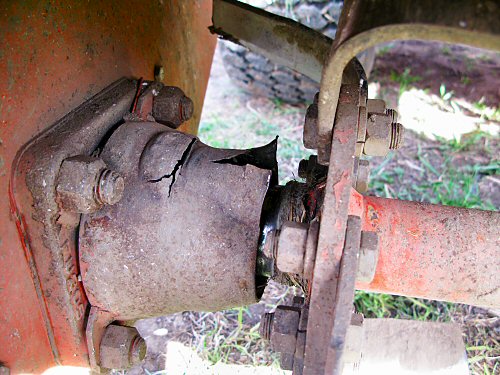
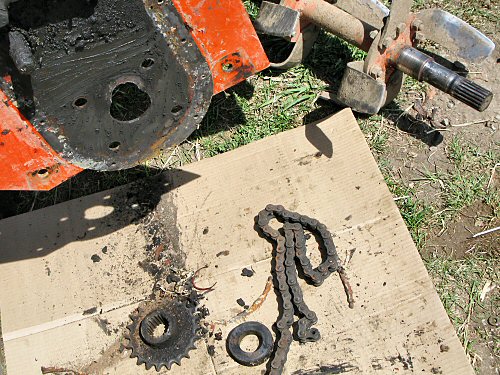
This is the not-good look of torn metal, not something you want to see on gear that’s both fairly essential to the tasks at hand, and ALWAYS expensive to repair. Right in the middle of some very satisfying tilling on Thursday, I heard a mild, unalarming scraping-squeaking sound coming from the rototiller on the Kubota compact tractor, so I stopped to check, just in case. When I rotated the tines by hand, I noticed the shaft had a lot of play on the left side, you could move it up and down a good inch or two. I cleaned off some wound up bits of plant and then dirt from the end and found the cap protecting the bearings had been split and peeled back. Uh-oh. It turned out to be not great, but could’ve been a lot worse. Somehow—not enough grease, or dirt finding its way into the bearings and gearbox, or both, or…something else—the shaft that drives the tines had completely pulverized the bearings and had been rotating directly against metal! Imagine the heat, the tortured, red-hot metal-on-metal—but it was still tilling real good… In the pic below, you can see where it ground out its own path, that extra piece of hole on top of the larger one. It had burned through the tiller housing, another plate behind it, and a heavy die-cast fitting that supports the shaft (that bolted-on square piece in the pic above), and jogged up enough to split the dust cover. Man!
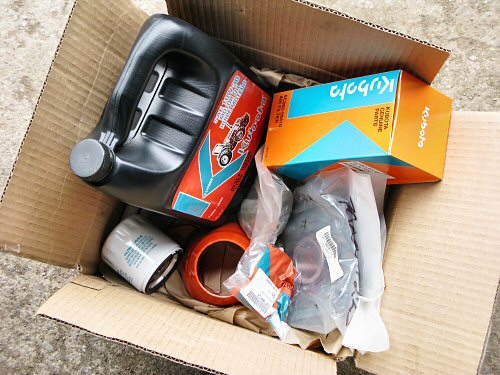
Of course, PARTS are always at hand, it just takes cash and a call to the tractor dealer, and presto, delivery by next day. Like an expensive little miracle… I hate buying parts, you need ’em, have absolutely no way to tell what they’re “really” worth, and they cost a fortune. This little boxful: $400 (well, besides the 4-bolt flange bearing, oil seal plate, bearing cover, and a couple of other bits, that includes the annual air and oil filters, and oil…). Anyhow, that’s the way it goes: things break down, gotta be fixed! This morning it was put back together, like nothing had happened at all…
Tangling with hoses
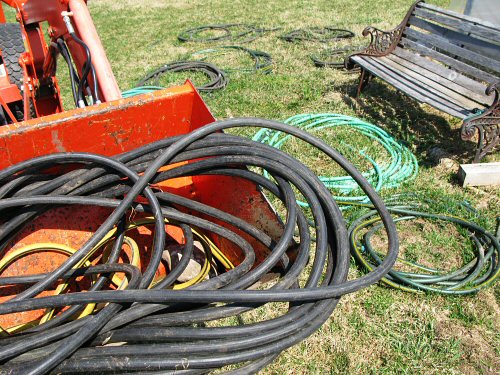
In smaller gardens (tinier farms!), hoses are generally a fact of life. In spring, it’s time to uncoil them all, check the fittings, and get set to deliver water largely by hand.
On BIG veggie farms, “hoses” are usually big pipes (3″/7.5cm and up), part of full-blown irrigation systems that suck up and spew MILLIONS of liters of water a season. Here on this tiny farm, we’re way closer to the garden hose end of the scale.
Our irrigation system is a work in progress. Drip tape is the ultimate goal, but there are obstacles to work around, like the limited water available from the barn well, and the distance to and lack of electricity at the spring-fed pond. Right now, watering is about regular 5/8″ hoses, fed by a 1″ plastic pipe that runs from the barn well to the pond located WAY at the other end of the field, with taps at 100′ intervals.
Actual watering is done with a combination of soaker hoses, sprinklers when there’s no wind, and various hand nozzles for watering in newly seeded beds. Quick connectors are a major convenience when hooking up the various combos of multiple hoses and other attachments. I try to find a balance between not too many hoses, because you can’t leave them lying around, and not so few that you’re moving the same rig all over the plot.
Accidentally tilling hoses that were left snaking around instead of being promptly put away has turned into a not absolutely rare occurrence, and a time-waster (untangling and splicing takes more than a minute). Just put away that 300′ of hose plus 500′ of soaker hose when you’re done! ;)
Spot irrigation with hoses on two acres is a bit tedious, but like everything else, you do get used to it, it’s part of the routine, and it gets the job done, which is satisfying in the end…
That’s the state of the watering art around here as we head into a new season, and I’m promising myself advances on the drip side of things. Of course, it could happen to rain all the time, about an inch (2.5cm) once a week would be fine, and then hoses would largely vanish from the garden landscape. That’s not at all that likely (and when it’s a really rainy year, you wish for hot, sunny hose weather), but…YOU NEVER KNOW!
Liming the Chickenhouse
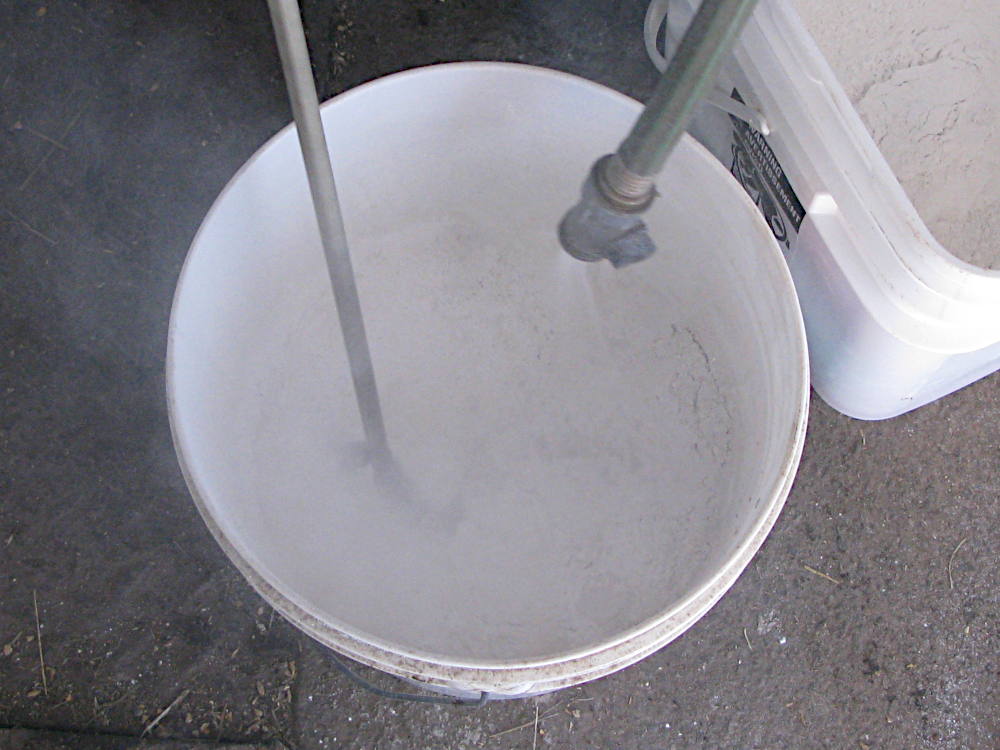
Whitewashed the meat bird half of the Chickenhouse today, using the traditional purist blend of nothing but hydrated lime and water. This is an old school farming standard from Bob, completely new to me.
The lime is a very fine powder that comes in bags. Mixing was easy. A power drill mixing attachment churned it to a thickness a bit lighter than regular paint, and then on it went with big brushes.
The lime is a bit caustic, so wearing a mask when mixing, and gloves and goggles to avoid splatter, is a good idea, although I didn’t this time around (and I did take care not to inhale clouds of lime dust!).
Afterwards (it’s follow Bob’s lead), I did some reading and, not surprisingly, was quite amazed: yet another simple, inexpensive, effective approach that’s been complicated (in this case, into the costly world of high tech paints and sealants).
Classic lime whitewash disinfects, repels insects, and preserves by sealing surfaces and wicking up water. It dries to an opaque white that beautifully reflects light to brighten up dim spaces.
It’s also safe for animals (which, yes, includes us humans, lime can even be used in chicken litter to keep it dry).
There are lots of applications, interior and exterior, for wood and masonry. It’s not as permanent as oil or latex paint, will rub off a bit, and needs to be refreshed every year to keep it in top shape.
It’s also INEXPENSIVE: a 50lb (22.5kg) bag was about $7, and you can mix up at least 15-20 gallons from that, the way we used it. That means you could whitewash an entire small building, inside and out, for maybe $20! For big jobs, a sprayer would make it real easy.
You can tint it, and there are also various recipes that include alum, salt and other additives that may improve adhesion, but the tried-and-true basic is just lime and water.
And you need hydrated lime (calcium hydroxide), NOT dolomitic lime nor calcium carbonate, aka garden lime (both are recommended for raising pH in garden soil). We got ours from the feed store.
I’m not sure how popular this sort of whitewashing is these days, but it’s certainly still used, and a few decades ago, this was a standard type of paint. Anyhow, it looks and sounds great, and we’ll see how the chickens like it!
WHICH LIME? Use hydrated lime (calcium hydroxide Ca(OH)2 also called builder’s lime, mason’s lime, slaked lime, or high-calcium hydrated lime). NOT agricultural/garden/barn lime (crushed limestone, calcium carbonate, CaCO3), dolomitic lime/dolomite (magnesium-calcium carbonate, roughly CaMg(CO3)2), hydraulic lime (variable composition, often containing silicates and aluminates), or quicklime/burnt lime/caustic lime (calcium oxide, CaO—dangerous to handle, boils over explosively, causes chemical burns).
Chickenhouse progress
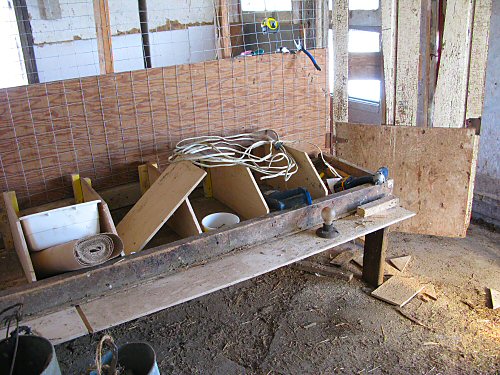
Work on the Chickenhouse has been moving along. It’s not a huge job, but all of the little bits and pieces take time, including foraging through the barn and drive shed for material to recycle. Here, you can see the bottom of the new door between the main sections, for baby meat birds coming in a couple of weeks, and the mature layers, due in June. And there are six new nest boxes. Most of the boxes I’ve seen in photos have a top, which I gather is partly to discourage roosting on the walls and the subsequent crapping into the nests. But I’m fully deferring to Bob’s design, based on his decades of all-around farming. He says it shouldn’t be problem. For me, I’ve been doing my chicken reading and chicken chatting, but it’s mainly learn as you go with Bob in the lead on this one!
Jack the Miniature Donkey has been amiably hovering around, checking out the construction with his head stuck in the door. Here, he’s hanging close to the Chickenhouse even when no-one’s home. The chickens will soon be his neighbors. He’s a friendly fellow, also quite territorial, and he can kick, so he ought to be good for protecting that flank! All in all, I’m really incredibly excited. I guess the city guy in me is still in there looking out… ;)