Rack built

New lumber turns into new grow rack. This adds a fourth to the set, a measure of tiny farm growth. I started with two in Year 1, built another one last year (Year 5). It’s not like the focus here is on rapid expansion…this is the speed of staying tiny! ;)

Although I don’t build these often, it seems to get quicker every time. Well under a hundred dollars of wood, wheels, screws, bolts, brackets, hooks and chains, plus a chop saw, a drill and a couple of hours, and there it is! Light fixtures are extra. In the pic, the shelves still have to go on.

Lying across the middle supports is one of the four old fluorescent fixtures, given to me instead of being tossed in the trash. Not only free, they’re BETTER: these are the overhead lighting type you see in (horribly lit) offices, the tubes are spaced farther apart than in the standard shop lights I’ve been using, the light will spread more evenly over a larger area—for the seedlings, a lot less leaning and stretching…

The watering tray

It’s funny how almost random objects can become practically indispensable tools. Like this rigid gray tray, given to me a while back, just the one, amongst a mixed bunch of plastic flower pots from bedding plants, passed along by a local gardener. For four seasons, I’ve used it to water the seedlings (all parsley in the pic): in goes a plug sheet in its webbed tray, sit for 10-15 minutes, then out to drain for a bit over the sink, and it’s back to the grow racks, good for another few days. I’ll keep this up until the seedlings are well-established, three weeks or more, depending on the crop. Perfect, except, at one point I’ll have maybe 50 plug sheets going at once, which means a lot of moving trays and tracking soak time. Not too efficient. I’ve been meaning to build a bigger watering tray, that can handle four or six plug sheets at a time. But I haven’t yet. As odd as it sounds, I’ve grown…attached to the one-at-a-time approach, and this particular, perfectly sized, always reliable gray tray! Every planting gets its own bit of focus each time it’s watered, developing its own little story on the way to the field. It’s part of the fun. Doing batches will be much quicker overall; the attention to what’s in each tray will be slightly less. Not a bad thing, there’s always lots to do with any extra time—continually improving by increments is also a main part tiny farming. With more seedlng starts this year than ever, I suppose I will build that bigger tray… Progress… ;)

Trip to town

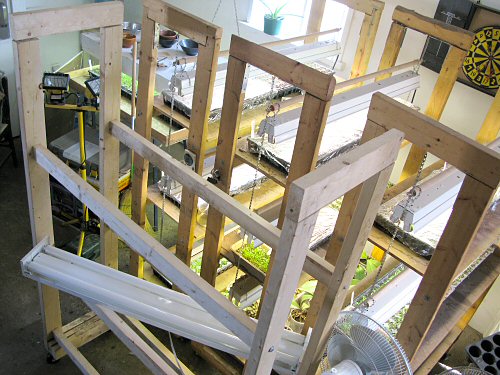
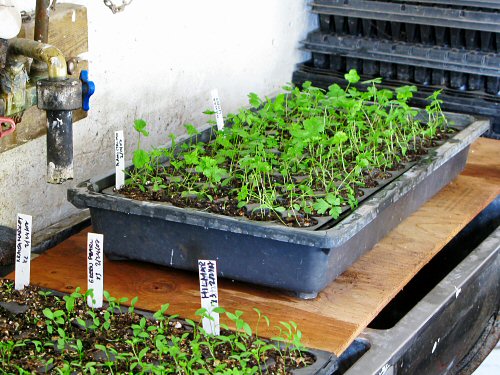
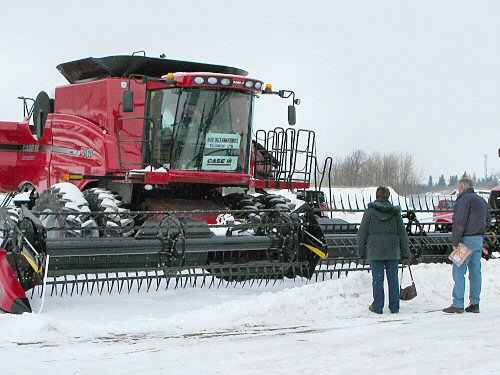
Took a trip to town today. During the winter, I get in once every 3-4 weeks, so it’s a bit of a novelty. This time in, we checked out an agricultural show, 28th year, filling the new fairground’s 45,000 sq ft of indoor exhibition space. It was quite busy, geared to the bigger conventional farmer, with aisles and aisles of heavy equipment, commercial seed, bank financing,… Outside, some even bigger machinery, like the combine harvester in the pic—it’s set up for soy—that could run over my entire garden in about 10 minutes (although the wraparound view from that air conditioned cab looks mighty inviting for a hot summer’s day in the field!). Inside, it’s mostly men in and around their 60s, with some wives scattered in. These guys were here with their fathers three decades ago, discussing new gear as family farms passed from fathers to sons. Now, the sons are the old farmers, and the next generation is nowhere in sight. Quite odd… Oh well, on to the super-sized supermarket, a Loblaws’ Wal-Mart killer, a huge deal with a produce court half the size of my market garden (not literally, but it’s pretty big), bakery, meat and fish counters, endless aisles, automated mini-bank, wine shop, tobacconist, full pharmacy, a whole section of clothing and housewares, and acres of convenient parking outside. It’s the old General Store, scaled up! I seldom do the grocery shopping for the farm, so when I do hit a supermarket, I head straight for the veggies first (I still kinda laugh at myself doing a “professional” veggie appraisal, this is the LAST situation I would’ve imagined myself in not too long ago). I bought some groceries: a bit of “fresh meat”, “fresh-baked bread”, a tub of mixed baby salad greens (and mine so soon to come!)… Only $200! Then, a quick fast food stop at A&W, not a guilty pleasure, or even a pleasure, just an old habit, a town routine… And there it was, a trip through the OTHER local food chain, 12 miles (19km) and a whole world away from the tiny farm. It’s a little surreal. Back to the seedlings… ;)

Seed starting tools II

Here are ALL the indoor seed starting tools I have, most of them always-used, a couple not. Nothing special, and FINGERS I’ve found are handiest for most of the work at this scale. In any case, a few details (and there’s more on #1-5 in Seed starting tools, part 1): 1. The Seedmaster, a gadget for trickling out small seed as you rotate the wheel (the yellow pieces are click-in filters for different seed sizes); 2. assorted white plastic plant labels; 3. a dibbler or dibber or whatever, for poking little holes in soil; 4. a fine-point black waterproof marker (I like Sharpies) for labeling; 5. the mini-transplanter is essentially a tiny, stainless steel shoehorn for easy liberation of plugs from their cells; 6. a moisture meter, simply stick it in the soil; 7. plant snips for thinning seedlings; 8. Mini-Sim seeder: fill and shake out; 9. suction seeder with three tip sizes: squeeze the bulb, put the tip on a seed, release to hold, squeeze again to drop… ($25…what was I thinking?!); 10. digital timer for keeping track of repetitive tasks like bottom-watering trays one by one; 11. plant light meter, reads in footcandles, with settings for indoor and out; 12. digital indoor/outdoor min/max thermometer/hygrometer, mainly for keeping track of temperature; 13. magnifying glass with light, for examining seedlings (and GREEN MOSS) up close; 14. soil scoop for filling plug sheets and pots with seedling mix; 15. spray bottle with good quality spray head (more water per pull; I’ve used a wand mister like I have in the greenhouse, but the hose kept getting in the way, I may try one again for the seedling room this year); 16. small fibrepak flats, convenient for holding tools and seed packets on the potting table (left lying, the packets can so easily get wet…); 17. small bulldog clips, useful for all kinds of things, like organizing groups of seed packets. And the winners are…all of them, EXCEPT for: #9, which I found to be useless for my purposes; #8 which is great, but mostly for heavier hand seeding in the field, like for flowers; and #6, 11 & 13, which are more educational toys than essential tools, but still cool! (Wow, that was a lot of blogwork for pretty obvious stuff, but there you go! :)

Lightbox suspended

Another seedling room set-up task checked off today: hanging the lightbox. Not exactly a big job—the chains were already there from last year—but having it in place is a big visual reminder in the Milkhouse that we’re heading into spring. The box, given to me two-three years back, has four 48″ fluorescent tubes on 5″ (12.5cm) spacing. Raised up a bit more, it gives pretty good light to the whole tray, which is about 3.5’x4′ (1×1.2m). It’s been a welcome bit of much-needed space for larger seedlings, though this year, with the barely-heated greenhouse plan, maybe it won’t be so critical. I still have to line the tray with plastic, and possibly get round to giving the box a coat of white paint…

Welcome to KeroWorld

What an odd thought, what image comes to mind: the world of kerosene… And now I’m in it! Purchased new today, at a healthy 35% discount, this small, rather inexpensive, KeroWorld-brand indoor kerosene heater is the core technology in the extended-spring greenhouse plan. The idea is to turn the unheated hoophouse into a barely heated one, by warming it at night so that it stays above 38°F (4°C). That way, I can put out seedlings weeks early, instead of crowding them under scarce indoor lighting until it warms up in April. It should also give the earlier-than-ever lettuce, going into the ground in the greenhouse, a smoother start. This heater is low-powered—10,000 BTU, recommended for 420 sq ft, it’s 640 sq ft out there—but only a wee bit of heat is required. I think. Last year’s propane space heater was quite efficient, but burned too much gas for every-night use, it often went out by itself, and it required lots of ventilation. Plus, I don’t really like relying on pressurized tanks. This heater will hopefully burn low and steady, and it’s pour-to-fill! Aided by a fan to keep the air moving, and row cover on the coldest nights, it should get the job done. This all reminds me of Patrick of Bifurcated Carrots’ comment a while ago about the line between good and bad technology. It seems a personal decision as much as anything. Why don’t I dream about full-blown winter greenhouses, with high-intensity lighting and industrial-strength heating and ventilation, I wonder? Dunno. I just don’t. But an extra growing month in the strengthening sun, and a little less reliance on indoor lights, traded off against some kerosene, well, THAT would be cool!

Seedling treatment

The fan is oscillating and the grow racks are slowly filling up. Parsley—curly and flat-leaf—are underway, and there’s more lettuce and some herbs…

Fanning the seedlings is particularly satisfying because it does a lot for such a simple thing. I forget where I heard about it, probably from a book, and I’ve been doing it since Year 1 or 2.

The idea is that plants develop differently when they have to deal with wind, or rain, or otherwise being pushed about. Seedlings raised indoors lead an extremely sheltered life; providing a bit of a breeze toughens them up, and this sort of mechanical stimulation (brushing is another approach) also encourages stockier growth instead of stretching.

It makes sense to me—seedlings definitely wouldn’t be so coddled growing out in the field! There’s even a term for this: thigmomorphogenesis! While hunting down the word, I found an interesting article about mechanical stimulation of seedlings as well (and here’s another).

I don’t follow a particular schedule, just give ’em at least an hour or two a day, sometimes more, turn the fan on and move it around every once in a while (I also make sure the seedlings are properly watered, since wind is great for drying out plants).

All in all, it’s easy, sounds good, hasn’t hurt! The fanning also dries the soil surface, which helps prevent damping-off, so you can’t lose!