After the row cover: weeding!

Weeding after row cover

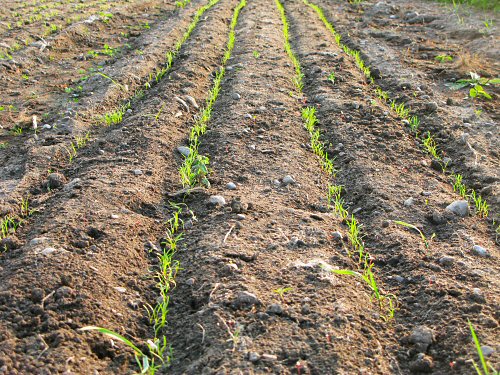
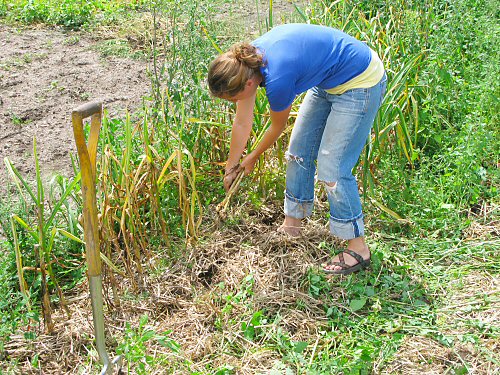
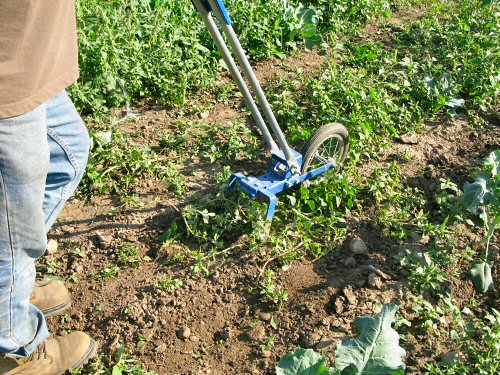
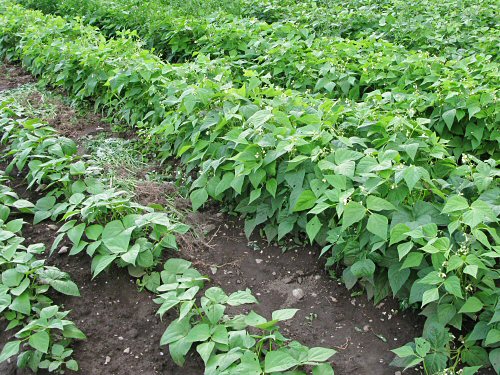
It’s been about six weeks, time to permanently remove the row cover from the last transplanting of fall brassicas! There are two sections, about 20 x 50′ beds in all, with broccoli, caulflower, cabbage, collards, kale. The cover protected against flea beetles, and at this point in the season, the FBs aren’t around much. Which leaves the post-cover weeding! I generally plan to remove the cover earlier, weed, and then replace it quickly, but this seldom seems to happen. Instead, it’s one big weed-a-thon at the end… Here, the mainly pigweed looks fairly big and dense, but it’s actually not much of a problem. The row cover has protected the ground from many days soil-packing rain, so the beds are nice and loose (it’s amazing how much rain can compact clayey soil).  Weeds come out easy! With two people, it’s a relatively quick job, 2-3 hours for a pretty thorough clean-up. We worked with a combination of hoe and wheel hoe, me doing the paths and between-row clearing, and Lynn hand hoeing in-row, between the plants spaced at 18″ (45cm)…

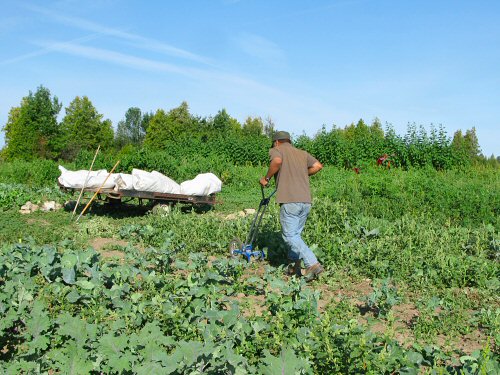
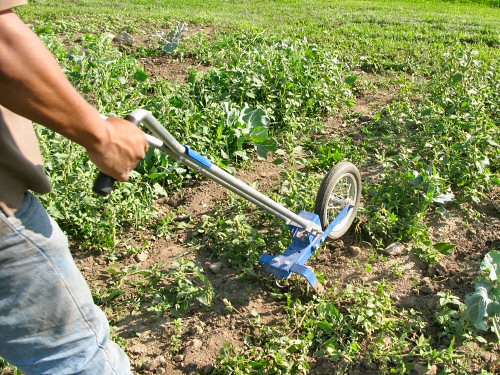
Each time I use the wheel hoe, I grow to love it that much more. So easy, so TIME-SAVING! It’s such a sophisticated yet simple tool, a perfect marriage of wheel, leverage and steel (you could say! :)… Today’s job is heavier work than it’s usually used for, the weeds aren’t just emerging, they’re pretty big. Rather than rolling the wheel hoe continuously down the rows, I’m cutting the weeds with a series of forward and backward strokes that either slice the plants below the surface, or pull them out, roots and all…

Clearing a path (before and after, above) in the loose soil takes maybe 3 minutes for 50′, many times faster than hoeing or hand pulling…

For this heavier weeding work, I use a fairly forceful forward stroke that travels about 1-1.5′ (30-45cm), then raise the blade to clear the felled weeds as I step forward to start the next bit…

The wheel hoe is equally good at cutting on a backstroke, which comes in handy for dense areas and tough specimens… It’s not particularly strenuous work: the blade is sharp, the wheel and angle of the handles give lots of leverage and momentum, and some part of the hoe is always in contact with the ground, so you’re never completely lifting the whole tool. Like most things I do here in the field, I’ve figured out how to use the wheel hoe on my own, by reading instructions, looking at pictures and applying my version of common sense. Techniques no doubt vary. It’ll be interesting to eventually see how others do things! Meanwhile, everything seems to work out…especially, the wheel hoe! (Wheel hoe action photos by Lynn)

Outhouse deluxe in action

The deluxe outhouse—deluxe because this converted ice fishing hut houses a slick new composting toilet—has been sitting out in the field for a month now, nestled behind the drive shed, just inside the gate at the top of the market garden field. It’s all clean and shipshape, but the interior decorating plans bouncing around back in early summer haven’t come to pass. No whitewash, no Tibetan prayer flags, candles, incense, or other deluxe fittings and accessories, just single-ply toilet paper and a small bucket of peat moss, for tossing in, a handful a day. No frills! The toilet is equipped with an electric heater and fan for dealing with high traffic—up to eight people, three times a day—but I haven’t plugged it in so far, as I’m the only regular client. So far, in fact, there’ve been only TWO other takers to pass through the door. Oh well, if you haven’t experienced convenient, in-field evacuation, without plumbing…you haven’t tried it all! No odor, no flies… It’s great!

Farmers’ market set-up

Settting up at the farmers’ market is definitely fun, although I tend to be in a mild daze with an average of literally three hours sleep before getting up at 5:30 (that’s just how it always works out for me :). Today, I planned to take pics of the whole routine, but forgot to start snapping from the beginning. At this point, the truck is unloaded, the canopy’s up, and we’re setting up the tables and trays, and starting to load up the veggies! Unfolding the sawhorses and placing the boards and trays takes maybe 10 minutes tops. Then, it’s on to placing the produce, after that, the price cards and signage. Stay tuned for more complete coverage…maybe next week!

Weighing eggs

Egg production has been moving along smooth as anything. The girls are great, easy going, seem to be having a good time, and they’re pumping out 23-25 eggs a day. Besides giving them out to everyone around here, there’s been enough to take to market every other week as a CSA bonus, usually, half a dozen per share. Bob unearthed an old egg scale from somewhere in the barn, and I’ve been playing with it lately (for actual distribution, there’s no sizing, everyone gets a mix). Egg size has definitely increased. Where they were mainly medium with a few small at the start, they’re now maybe half medium, half large. The scale is the kind of old school tech that I love, with everything simple, open, obvious, and FIXABLE. It may be a little hard to read in the pic: there’s a little pointer, with a fleck of red paint on it, at the bottom of the open triangle of the indicator—this egg’s Large, just on the border of XL…

Burlap expires

After a nice long ride, the burlap (of the burlap carrot germination method) is finally breaking down, shredding as we fold it up off the final carrot beds of the season.

Even in this wet weather, the burlap makes a big difference, probably because it holds the soil heat—the difference is clear at the ends of the beds, where the seed drills extend past the burlap, and germination has barely started.

I haven’t been keeping accurate count, but this batch has done at least eight seedings over the last two years. At about $30 a bed for a double layer of burlap (100’/30m) over a 50′ (15 m) x 4 row bed, that makes it less than $4 per 200′ (60m) of carrots, more than worthwhile. If we’d taken better care of it during this wet weather, mainly by making sure it dried out quickly, it may’ve even lasted for a seeding or two more.

Like floating row cover, burlap is an outside input that I don’t like to rely on, but for now…it works!

Garlic all in

Harvested in three parts over the last week, the garlic is now all in! This crop seems to’ve done well once again (I LOVE growing garlic!). For the first time, there’s a small pile of damaged goods, water-logged from all the rain. But overall, things are looking good. The combination of oat straw (from last fall’s cover crop) and grass mulch worked great (below)—weeds were kept down, and although the paths weren’t as heavily mulched as around the plants, they weren’t bad. We’ve been having trouble starting the riding mower, which means no trailer, so the tractor bucket took its place for transport duties. The garlic is stacked on pallets in the barn. Lynn seems to’ve taken to garlic harvesting and went to town: fork and pull, fork and pull…around 3,000 garlic bulbs hit the local food chain!

Beans and big weeds

Hand pulling big weeds is a regular garden feature this summer of rainy, weed-favoring weather. In the before and after, the second and third plantings of snap beans (Jade and Indy Gold) are disappearing under soaring lamb’s quarters and pigweed: a couple of hours and a couple of pairs of hands later and they’re looking good.