View from the stand

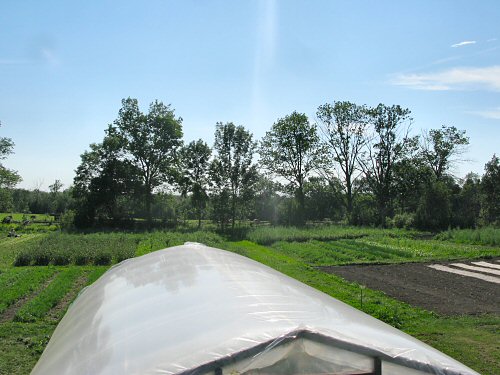
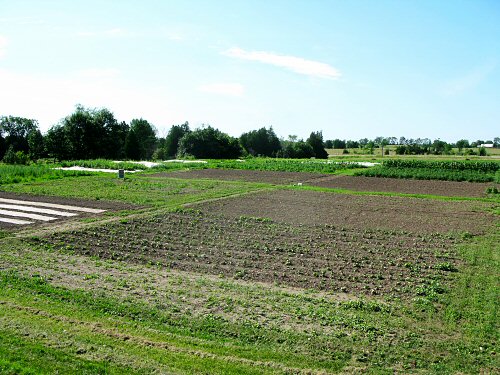
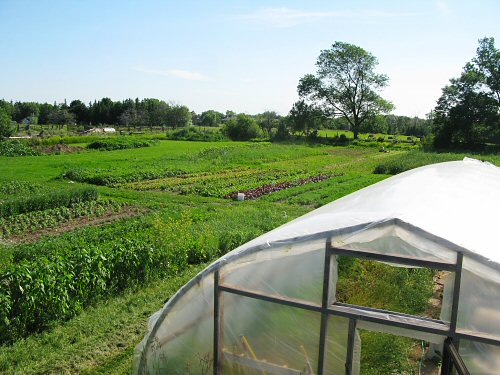
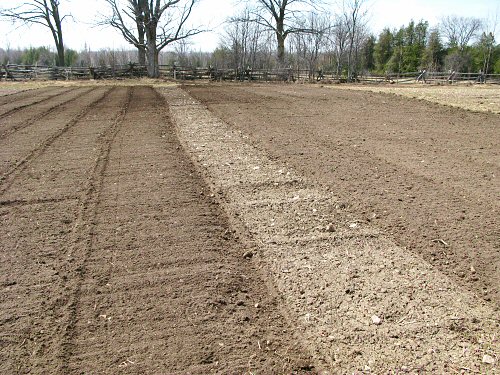
It’s mid-July, and on a (recently rare) sunshiney afternoon, things are looking OK. Better from a distance than up close, because a few sections, like the summer and winter squash, are quite severely in the weeds and in need of intensive hand pulling. And the ground remains almost constantly wet. Our moisture-retaining clay-loam soil, such an advantage in the usual near drought conditions we’ve had over the last three years, is now a bit of a hindrance. Sprawled tomatoes are particularly at risk if they don’t dry out against damp ground, and instead contract early blight (more about that another time!). Still, carpe diem, huh—seize the day! From atop the farm stand, the view is fine! We have the north end (above), with carrots under burlap (third planting), brassicas (newer transplants still under row cover), the cover in the far middle over squash, in front and more to the right, tomatoes, with a windbreak of giant sunflowers at the very right, and sweet potato bottom center. Open sections will include brassica transplants in a couple of weeks, and a fall cover crop. Out of sight to the north are onions…

In the middle, clockwise from the left, there’s a second planting of carrots, fifth mesclun right in the corner (with Maria weeding on the Greens Machine), garlic and parsnips, and potatoes in the distance (with more big WEEDS), the first planting of beets, carrots and green onions, and the edge of the third carrots under burlap from the first photo.

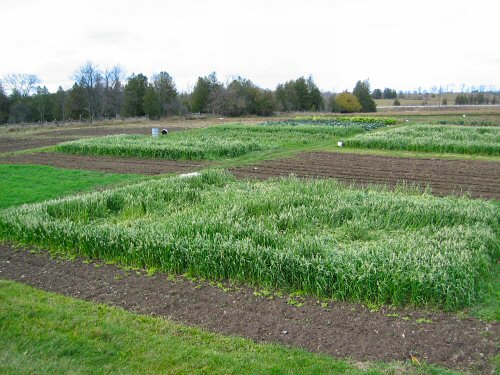
And then, the south end of the field, going left from the peak of the greenhouse, the garlic and Maia in the mesclun, the second planting of carrots and beets (that slash of of red is Bull’s Blood beets), the fourth mesclun , a weedy area with nasturtiums and tomatillos, and to the bottom left, herbs and flowers (fairly towering Jerusalem artichoke at the bottom left). (Guest photos by Lynn)

Just radishes…

The only thing new for the farmers’ market this week were a couple of rows of Rebel radishes, with their signature flea beetle-bitten leaves—today was nothing like the busy Friday harvest days to come… Radish is the only brassica crop I grow that doesn’t have to be row covered against FBs. They grow so fast that the damage doesn’t hold ’em back much, and most people around here don’t eat the leaves… Here, they’re bunched and floating in one of the rinsing tubs. They could’ve used a few more days in the ground to get BIGGER, but they’re light and perfectly crisp as they are. Tasty! (Guest photo by Shannon.)

Row cover everywhere

Row cover on spring transplants

It was impossible to capture all the floating row cover outposts scattered around the feel in just one shot. This pic shows maybe a third of the area under the light, white, spunbond polyester protection. Right now, it’s being used as protection from two separate things: frost and bugs. Let’s see, it’s on all the cucurbits (so far, that’s cucumber, summer and winter squash, and pumpkin) to protect from the cold and striped cucumber beetles, on tomatoes against cold (and coming off in a few days), on the brassicas (broccoli, cauliflower, and the like) against ravaging flea beetles but not the cold (coming off when the plants are fairly big and can withstand the FBs). I’ve used row cover from Year 1, far as I can remember (there are NOTES and even pics…somewhere). Initially, I really didn’t like it, it looked so…unearthy, synthetic,…not part of the garden. BUT, the alternatives, like planting later, ending harvest earlier in fall, temporary wind breaks and cold air channels, trap crops, and all sorts of complex interplanting (so one crop protects another), encouraging beneficial insects, more elaborate timing (basically, closer second guessing of insect cycles and the weather), not to mention a completely adapted, semi-permaculture set-up where everything is at home no matter what, were all way out of what I could handle as I dove into tiny farming with the intention of heading to the farmers’ market in the first season. Floating row cover lets me extend the season by at least a couple of weeks at each and, and I can avoid all pesticides (and there are some killer insecticides allowed even in certified organics) and a lot of bug grief (stemming from lots of LOSS). I still don’t really LIKE row cover, though, the way I like, say, my Sneeboer three-tine cultivator or even the Horse rototiller (I can understand how the Horse is built, get if fixed, or do without). More and more lately, I wonder when FRC will become insanely expensive, or real scarce, or just plain run out… It’s as oil-based as they come, and kind of in a high tech product class of its own. This year, in a small fit of…paranoia (?), I actually ordered a new 1,000’x14′ (300mx4.3m) roll, even though I have enough for this season at least. It’s not much of a stockpile, but, carefully managed, it could get me through 3-4 more years along with what’s on hand, at this tiny farming scale… Oh, well, the more you know, the less you need is what I believe. I’m learning as I go. Keep farming long enough, and I’m sure I’ll get beyond the cover if it doesn’t run out on me first…! :)

Seedlings away!

Things can change suddenly on the tiny farm. I picked today to move the majority of seedlings to the greenhouse. Although this was MUCH later than hoped for earlier this year, it’s all about the (recently COLD) weather, and I didn’t want to spend much on heat. But you can’t wait forever. There’ll probably be at least a couple of freezing nights in the next two weeks, but it IS getting to mid-May, and these guys will be out in the field, one way or another, before the end of the month. So, it’s out of the Milkhouse and onto the trailer behind the little John Deere riding mower for a little trip…

The greenhouse tables are now just about full, and that’s with a fourth one added a week or so ago. Plus, there are a few more trays of plug sheets on the ground off to the right. Lots more seedlings than ever before… On the closest table, there’s the (excellent) digital min-max thermometer/hygrometer, recording critical highs and lows, right after the fact! New this year are those red and green plastic pots (with cukes, squash, pumpkins, melons)—I decided to stop using the 3″ peat pots and try soil blocks, BUT, I didn’t feel like learning about block making right in the rush, so I used the last of the peat and then dipped into the collection of plastic pots I’ve been given over the years. (I’ll get the soil block maker in the summer, so I can play around with it first…)

It’s always a little…sad when bright, cheerful gear goes dark and empty… There are still a few trays of really young tomatoes, brassicas, and a couple of other late-started things, but the grow rack days are just about over for the year. We’ll soon be stowing the lights and chains, and presto, instant rolling racks for harvest bins. Transplants for late spring and summer will get started in the greenhouse…

And so, the seedling greenhouse gets tucked in for its first full-house night of the season. Boy, imagine if something WENT WRONG in there… :)

Field day!

Winter-killed brassicas

Left to the last possible harvest in the fall, brassicas like kale, Brussels sprouts, cabbage, broccoli and cauliflower (above), were eventually winter-killed and now have to be cleaned up—one of the first field-readying jobs of spring! Today, I started. (EVERY day is a field day from here on in, through November at least, or the first heavy snow that sticks.) A day of tiny farming fieldwork is really just a whole lotta gardening… Now that the ground has dried out enough to be tillable (that could’ve been yesterday, but…errands and CHICKENS), and warmed up enough to direct seed the crops that germinate in cooler soil, it’s a whole new world of things to do…and think about doing. There are two basic ways to ponder the progress of the season’s garden: by timing and by area, each useful in its own way. Timing is mainly about the plants: when to seed, when to water, when to harvest. Area is about where to locate particular plantings, which in my case doesn’t mean absolutely running out of space, since there’s lots more field to expand the garden into if I wanted to (which I don’t), but more like where to position stuff efficiently, so you’re maintaining crop rotation, but not having to, say, drag hoses all the way down the garden to a couple of newly seeded beds that need daily watering in (although there’s a field production plan made up, there are lots of adjustments on the way—where to put stuff will come up again and again!). So, the start of the season is mainly about area, because you have to prep beds and get veggies in in a rough order—cool soil seed, then cool weather transplant, then warm soil seed and transplants—and the timing is a constant: it’s all right away! One way I keep overall track of this garden is by counting sections: it’s about 2.5 acres, divided into 40 50’x50′ squares (each fits 10-16 beds, depending on width). At some point in the next six weeks or so, almost all SHOULD be planted out, nearly 40/40. Today, I started seeding in one…

Tilled and untilled: Partially composted cow manure was spread and incorporated in the fall. Now, a light rototilling to prepare for seeding is all that’s needed. Today, I used the tiller on the Kubota compact tractor.

Rock beats tiller: There are lots of stones in this field, they work their way up continually, and even a fist-sized rock, caught in the right way, can stall out the 48″ rototiller on the Kubota (it’s a tiny tractor!). No problem: remove and restart.

Getting set to seed: I work mostly one or two sections at a time, prepping an area with the tiller, marking the beds, then seeding (or transplanting). This way, I can get the crops that need to be started in as quickly as possible. Here’s the cart towed by the riding mower, loaded with assorted seeding gear (and some transplants being ferried to the greenhouse).

Making beds: Oh, there’s A LOT of tiny farm history behind my bed marking methods. :) I’m still working on the most efficient way to set up beds. Right now, it’s fairly streamlined, involving a 100′ tape measure, stakes, and pacing off distances. This year, I’m planting in 3′, 4′, and 5′ beds (that’s path included), depending on the crop.

Customizing the Rake: Every season, I re-ink faded measurement markings on a couple of hand tools I use the most. Here’s a convenient mark for 42″ from the top of the handle (that’s the planting area width for a 5′ bed. There are other marks further up the handle, and the whole rake is exactly 5′. It’s convenient for quick checks, especially on the favorite rake that I use for touching up beds right before seeding. And so, off we go…!

The seed…

Keeping up with the early start, I got out the seed from its storage chest to take a look. With the tiny farm’s growing HISTORY (hey, Year 6, coming up!), keeping the seeds sorted for freshness is an ever more…serious consideration. Old seed won’t work, and there’s always lots of carryover from year to year. For this garden’s veggie selection, seed life in cool, dry storage conditions falls into three categories: nice and long (around 5 years, for brassicas, cucumber/squash family, lettuce, tomatoes,…), medium (around 3 years: beans, peas, carrots,…), and SHORT (1-2 years, for onions, corn, parsnip, parsley,…not too many here). Luckily, this is all book info, not gathered from painful personal experience! But I listen closely, ’cause one of my biggest garden nightmares is THINGS NOT GERMINATING… There are enough reasons why gazing happily on those newly seeded, semi-straight rows might be the greatest satisfaction they ever offer, and dead seed shouldn’t be one of ’em. My first germination test last year seemed to bear out the wisdom of others: normally-stored seed is not forever… So, it’s checking packs and taking dates!

Cleaning up

Fall field

Here’s a look to the north from my new favorite photo spot, on top of the farm stand. We’re down to mainly brassicas, oats and rye (that’s the low, darker green section poking in on the left). The oats has started to die off and topple over, leaving collapsed areas that look as if animals had bedded down… The days lately have mainly been overcast and quite cold, just above 0°F, with a fair bit of rain that leaves the ground mucky. My hours a day spent in the field are winding down, a two or three hour job at a time, weather permitting. Elsewhere, there’s lots of putting in order and stowing away, and clean-up in the Extended Milkhouse where all kinds of junk accumulates over the year. Getting set for winter.

Turn to the left and here’s the view over the greenhouse. The grass-alfalfa mulch is still inside, along with stacked rolls of row cover.